Gecho
Channels
Firmware 1.0.118
1-4: Meditative soundscapes & demo songs
- Sensor S1 controls delay as usual.
- Sensor S2 lowers background sample mixing level.
- Sensor S3 increases filters resonance.
- Sensor S4 adds arpeggiator effect.
- Button B1 switches between high-pass and low-pass filtering (the default varies by channel).
- Button B2 generates new random chord progression.
- Buttons B3,B4 control fixed delay and inputs as usual.
- Button SET starts binaural beats. Press repeatedly to select one of the 4 programs.
11: The original channel #1 (from v1 model) Updated!
- Sensor S1 increases the background noise level.
- Sensor S2 decreases the background noise level.
- Sensor S3 increases filters resonance.
- Sensor S4 adds arpeggiator effect.
- Pressing buttons B3,B4 control fixed delay and inputs as usual.
- Holding button B3 decreases input levels.
- Holding button B4 increases input levels.
12: Song of Wind and Ice
- Button SET starts isochronic tones. Press repeatedly to select one of the 4 programs (current program is indicated by a blinking orange LED: alpha, beta, delta, theta).
13: White noise
- This channel has no interactive controls. It emits mathematically generated white noise, the generator is pseudo‑random, not a true RNG.
14: Bytebeat
A chiptune-like mathematically generated "songs", as demonstrated in:
- Sensors S1-S4 influence various constants in the formula.
- Button B1 select next song. There is 8 songs and the current one is indicated by respective red LED.
- Button B2 adjusts stereo panning. There are 4 levels and the current setting is indicated by pairs of red LEDs.
- RST+B1 decreases the playback/calculation speed.
- RST+B2 increases the playback/calculation speed.
22: Infinite looper with octave up/down pitch shifter
- Sensor S1 controls delay as usual. You can think of delay here as if it was "tape loop length". Button 3 overrides this sensor.
- Sensor S2 reverses playback and recording direction.
- Sensor S3 adds lower octave (half speed) overdub.
- Sensor S4 adds higher octave (double speed) overdub.
- Button B1 decreases speed, current setting is indicated by blue LEDs.
- Button B2 increases speed in a similar way.
- Buttons B3,B4 control fixed delay ("tape length") and inputs as usual.
- RST+B1 lowers the delay persistence, i.e. ratio of how much signal is mixed back to the loop. Range is from 32/40 to 39/40, default at 38/40. Current level is indicated by white LEDs.
- RST+B2 raises the delay persistence in a similar way.
23: Infinite looper with LPF, HPF & flanger
- Sensor S1 controls delay as usual. You can think of delay here as if it was "tape loop length". Button 3 overrides this sensor.
- Sensor S2 raises cut-off point of the high-pass filter.
- Sensor S3 lowers cut-off point of the low-pass filter.
- Sensor S4 adds flanger effect, the maximum range is almost 3 octaves down (perceived pitch).
- Button B1 decreases speed, current setting is indicated by blue LEDs.
- Button B2 increases speed in a similar way.
- Buttons B3,B4 control fixed delay ("tape length") and inputs as usual.
- RST+B1 lowers the delay persistence, i.e. ratio of how much signal is mixed back to the loop. Range is from 32/40 to 39/40, default at 38/40. Current level is indicated by white LEDs.
- RST+B2 raises the delay persistence in a similar way.
24: Infinite looper with warping and reversible delay
- Sensor S1 controls delay as usual. You can think of delay here as if it was "tape loop length". Button 3 overrides this sensor.
- Sensor S2 reverses playback and recording direction.
- Sensor S3 decreases speed, the range is from 1x to 1/2x (one octave down).
- Sensor S4 increases speed, the range is from 1x to 2x (one octave up).
- Button B1 decreases speed, current setting is indicated by blue LEDs.
- Button B2 increases speed in a similar way.
- Buttons B3,B4 control fixed delay ("tape length") and inputs as usual.
- RST+B1 lowers the delay persistence, i.e. ratio of how much signal is mixed back to the loop. Range is from 32/40 to 39/40, default at 38/40. Current level is indicated by white LEDs.
- RST+B2 raises the delay persistence in a similar way.
31: Granular sampler
- Sensor S1 controls detune, first 4 levels (indicated by 4 red LEDs) cause slight detune, the remaining levels cause stronger detune.
- Sensor S2 enables sampling of the new material. Triggering this sensor to a higher level increases stereo spread.
- Sensor S3 changes basic chord between major and minor when temporarily triggered.
- Sensor S4 increases number of voices, the range is 3 to 27.
- Button B1 loads one of the pre-programmed demo songs and plays it.
- Button B2 loads user-programmed chord progression (see channel #111).
- Buttons B3,B4 control fixed delay and inputs as usual.
32: Decaying reverb
This channel uses 1 reverb buffer and 1 delay buffers. Check channel #322 for polyphonic variant with 3+1 buffers.
- Sensor S1 controls delay as usual.
- Sensor S3 raises cut-off point of the low-pass filter.
- Sensor S4 shortens the reverb buffer length (so it sounds like if the pitch went up).
- Button B1 adjusts the direction of decay downwards. Current setting is indicated by blinking red LEDs. Two middle LEDs blinking means the decay is stopped.
- Button B2 similarly, adjusts the direction of decay upwards.
- Buttons B3,B4 control fixed delay and inputs as usual.
33: Dekrispator
- Button B1 browses to the previous patch (patches are defined in config file).
- Button B2 browses to the next patch.
- Buttons B3,B4 control fixed delay and inputs as usual.
- RST+B1 loads the recent user-generated patch from persistent memory.
- RST+B2 loads a new sequence (sequences are defined in config file).
- Button SET enables more options, press it once and orange LEDs will start blinking.
- Button B1 while options enabled generates new "effects" part of the patch. The new patch is stored in persistent memory.
- Button B2 while options enabled generates new "parameters" part of the patch. The new patch is stored in persistent memory.
- Button B3 while options enabled enables or disables delay/envelope/filters for the current patch. The current setting is indicated by red LEDs. First two = delay enabled, middle two = envelope enabled, last two = filters enabled.
34: MI Clouds (granular mode)
This channel supports multi-knob MIDI controls in following order: texture, reverb, density, pitch, position, size, feedback, stereo spread, dry/wet and post gain. To assign these controls, use "learning mode" in the configuration settings (in older printed manuals this is blank). Without this configuration, PB and CC wheels are supported to control texture and reverb parameters.
How to set up MIDI controls: Video guide and demo of this channel is here. When the unit is idle (e.g. after powering on or restart), plug in the MIDI controller (top right connector) and do not forget to set the switch to "IN" position. Press SET, B3, B1. Twist all knobs one by one to assign them to the controls in the desired order (red, orange and blue LEDs will indicate that it works). Up to 12 knobs are supported, but 10 is enough for Clouds. If you have a controller with less knobs, the ones that are present will still work. Press SET when done configuring. In order to revert back to classic PB/CC wheels, restart the unit and use the "reset configuration" command: SET, B3, B2. The MIDI controller configuration is stored separately and not cleared by the #4321 command like the rest of the settings. Both 3-byte and 6-byte MIDI messages are supported, so various controllers should work - those with absolute-position potentiometers and infinite encoders. Tested with Akai LPD8, Arturia MiniLab clone and Traktorino. These controllers cannot be connected directly, you need to use a "MIDI USB host", because the Loopsynth does not support MIDI over USB, only native MIDI signal (the classic DIN5 or newer 3.5mm Jack with TRS MIDI A standard wiring). Various ready made USB hosts exist, but if you want to go DIY route, you can build one easily from these two modules and any USB-C or USB-micro-B breakout board for power.
Check channels #342 and #343 for this sound engine's alternative modes.
- Sensor S3 freezes the signal (indicated by blue LEDs), which is useful mainly when playing on the MIDI keyboard.
- Button B1 browses to the previous patch (patches are defined in config file).
- Button B2 browses to the next patch.
- Button B4 selects the input source as usual.
- Button SET enables more options, press it once and orange LEDs will start blinking.
- Button B1 while options enabled browses through parameters, selecting the previous one. Indication will be added but for now you need to watch the debug console output over serial port to see what you are doing.
- Button B2 while options enabled browses through parameters, selecting the next one.
- Button B3 while options enabled decreases value of the currently selected parameter.
- Button B4 while options enabled increases value of the currently selected parameter.
- RST+B1 while options enabled decreases the limiter threshold.
- RST+B2 while options enabled increases the limiter threshold.
41: DCO (Digitally Controlled Oscillators) ported from v1 model
- Sensors S1-S4 influence parameters in a chaotic way. This channel is meant to sound like its equivalent in v1 model, but there are differences.
- Button B1 changes reaction speed of the sensors, allowing for smoother controls (it cycles through 5 possible levels).
42: DCO (Digitally Controlled Oscillators) with more controls
- Sensors S1-S4 influence parameters in a chaotic way.
- Button B1 enables autonomous drifting of parameters; it cycles through 8 levels of this setting).
- Button B2 selects different waveform; it cycles through sine, square, saw and none (so droning is off and only the external sound is processed).
- RST+B1 increases the oversampling, lowering the frequencies.
- RST+B2 decreases the oversampling, raising the frequencies.
43: Filtered "Space" channel
- Sensor S1 controls delay as usual.
- Sensor S2 increases source noise intensity.
- Sensor S3 increases filters resonance.
- At the same time, sensors S1-S4 control individual low-pass filters.
- Button B1 increases the upper range for filters' cut-off point.
- Button B2 locks or unlocks effects (S1-S3). If locked, the sensors will not trigger effects, only influence filters' cut-off point.
- Buttons B3,B4 control fixed delay and inputs as usual.
- Button SET starts binaural beats. Press repeatedly to select one of the 4 programs.
44: Filtered "Space" channel with reverb
- Sensor S1 controls delay as usual.
- Sensor S2 increases source noise intensity.
- Sensor S3 increases filters resonance.
- Sensor S4 adds reverb effect.
- At the same time, sensors S1-S4 control individual low-pass filters.
- Button B1 increases the upper range for filters' cut-off point.
- Button B2 locks or unlocks effects (S1-S3). If locked, the sensors will not trigger effects, only influence filters' cut-off point.
- Buttons B3,B4 control fixed delay and inputs as usual.
- Button SET starts binaural beats. Press repeatedly to select one of the 4 programs.
111: Custom chord progression
This channel waits for you to select how many chords you want to define. Initially ou can see 4 red and 2 orange LEDs glowing, that's 8 chords total. Use the buttons to change it, the range is from 1x1 to 8x4 chords. Confirm your selection with SET. Alternatively you can just start playing MIDI keyboard, then you don't need to specify number of chords up front (and there can be more than 32 chords). When done, press SET.
- Button B1 creates new chord (starting with c-major), or shifts it down by a semi-tone. You can press it repeatedly to get to the desired key.
- Button B2 similarly, creates new chord, or shifts it up by a semi-tone.
- Button B3 navigates the pointer to the next chord.
- Button B4 navigates the pointer to the previous chord.
- Button B1+B2 changes to minor chord and back. (Use B1 as a "shift" key: press B1, press B2, release B2, release B1).
- Button B1+B3 moves the middle note around, so you can create alternative chords too.
- Button B1+B4 moves the third note around, so you can create alternative chords too.
- Button SET finishes the process. If you see red & orange LEDs blinking, that means you have not defined enough chords - use B3/B4 to move around to find out where a chord is missing. If enough chords are defined, this will store the result into persistent memory at "slot 0", where the progression is accessible by other channels.
- Button RST cancels programming and exits the channel.
112: Load chord progression
Copies the chord progression from a selected slot in persistent memory to slot 0, to make it accessible by other channels. It waits for you to key in the "slot number". This can be 1-8 digits long, only consisting of digits 1 to 4 as there are only 4 buttons. If no chord progression exists at a given slot, you will see all red LEDs blinking. If a chord progression was found, you will see a short "progress bar" animation as it is being loaded to "slot 0".
- Buttons B1-B4 are used to key in the slot number.
- Button SET confirms your choice.
- Button RST cancels the operation.
113: Store chord progression
Copies the chord progression from slot 0 to another slot in persistent memory. It waits for you to key in the "slot number". This can be 1-8 digits long, only consisting of digits 1 to 4 as there are only 4 buttons. If a chord progression exists at the slot already, it will be overwritten.
- Buttons B1-B4 are used to key in the slot number.
- Button SET confirms your choice.
- Button RST cancels the operation.
114: Delete chord progression
Deletes the chord progression at a selected slot in persistent memory. It waits for you to key in the "slot number". This can be 1-8 digits long, only consisting of digits 1 to 4 as there are only 4 buttons. If no chord progression exists at a given slot, you will see all red LEDs blinking. If a chord progression was found, you will see a short "progress bar" animation as it is being deleted.
- Buttons B1-B4 are used to key in the slot number.
- Button SET confirms your choice.
- Button RST cancels the operation.
121: Simple drum kit
Sensors trigger four built-in drum samples. Sequencer and custom samples (loaded from SD) will be added later. (WIP).
122: Sea, creek and forest
Plays all 4 soundscape samples without chords or melody, mixing levels are controlled by sensors or accelerometer, microphone or line-in signal is added too.
- Sensors S1-S4 influence mixing level for individual samples.
- Pressing buttons B3,B4 control fixed delay and inputs as usual.
- Holding button B3 decreases input levels.
- Holding button B4 increases input levels.
123: Pass-through from microphones
Useful for recording of material to be used in other channels. To play back the recorded files use channel 2222 (or long press SET while idle).
- Holding button B3 decreases input levels.
- Holding button B4 increases input levels.
- Buttons B3,B4 control fixed delay and inputs as usual.
124: Pass-through from line-in
Useful for recording of material to be used in other channels. Works the same as channel 123 but selects the line input by default.
221: SD Mellotron
Plays arbitrarily long samples from SD card, mixing up to 3 voices. Controllable with MIDI, with basic mixing of up to 3 samples.
How to set it up: Create a directory "mellotron" on the SD card, and within it, make a directory for each note (e.g. "c2", "d#3") or just "c" to cover all octaves by the same sample. You can use as many samples as there are keys on your keyboard, or as little as 12 notes to have all keys covered. Put one sample into every directory (filename does not matter). Stereo samples at 16-bit are supported, sampling rate is detected from the 1st file found and applied to all samples.
This is a primitive sound engine that uses simple additive mixing so if the sounds are too loud you may get clipping when pressing more keys at once. Normalization and pitch shifting is planned in future.
322: Polyphonic Reverb
Check the demo here. This is a variation of channel #32 with 3 buffers, otherwise the same controls are supported. Their lengths are controllable using MIDI keyboard, which results in perceived change in pitch.
342: MI Clouds (stretch mode)
This interesting effect picks short fragments from incoming signal, stretches them and and overlays, building up interesting timbres. Otherwise it works the same as #34 (Clouds in granular mode), supporting multi-knob controllers (10 parameters) and is playable using a MIDI keyboard. Without an external controller, it is still possible to edit all parameters in the same way as in the granular mode (#34). If multi-knob controller is not set up, PB and CC wheels are supported to control texture and density parameters.
- Sensor S3 freezes the signal (indicated by blue LEDs), which is useful mainly when playing on the MIDI keyboard.
- Button B1 browses to the previous patch (patches are defined in config file).
- Button B2 browses to the next patch.
- Button B4 selects the input source as usual.
343: MI Clouds (looping delay mode)
Check the demo here. This mode works similar to granular mode (#34) but results in different effects. It supports multi-knob controllers (10 parameters) and is playable using a MIDI keyboard. Without an external controller, it is still possible to edit all parameters in the same way as in the granular mode (#34). If multi-knob controller is not set up, PB and CC wheels are supported to control texture and density parameters.
- Sensor S3 freezes the signal (indicated by blue LEDs), which is useful mainly when playing on the MIDI keyboard.
- Button B1 browses to the previous patch (patches are defined in config file).
- Button B2 browses to the next patch.
- Button B4 selects the input source as usual.
222: SD recording slicer
Takes one of the recorded files (those from "rec/" directory on SD card), selects a few random segments from it, and loops them around. The current segment is indicated by red and orange LEDs. At first, the most recently recorded file is selected, you can select some other using button combinations SET+B1 & SET+B2.
This channel reacts to MIDI (clock and key press events). The incoming clock overrides segments length, leaving each of them playing for the time controlled by tempo. Once you start playing the keys, segments are mapped to the keys, so you can select which one plays, when and for how long (from that point the tempo is ignored). If there is more keys than segments, they will repeat. If there is more segments than keys, some of them will not be possible to trigger from the keyboard. You can use buttons B3 and B4 to shift segment positions around the wav file.
- Sensor S1 temporarily reduces segments length.
- Sensor S2 temporarily reduces number of segments.
- Sensor S3 slows down the playback.
- Sensor S4 speeds up the playback.
- Button SET randomizes all segments again.
- Button B1 decreases number of segments (by factor of 2, down to 1).
- Button B2 increases number of segments (by factor of 2, up to 64).
- Button B3 (before MIDI is active) decreases segment length (halving it).
- Button B4 (before MIDI is active) increases segment length (doubling it, up to approximately one second).
- SET+B1 selects previous recording.
- SET+B2 selects next recording (or skips to the first one when the last has been reached).
- Button B3 (once MIDI is active) moves the starting position of the currently playing segment towards the beginning of the wav file, by approximately 600ms.
- Button B4 (once MIDI is active) moves the starting position towards the end of the wav file.
- SET+B3 (once MIDI is active) moves the starting position of the currently playing segment towards the beginning of the wav file, by approximately 150ms.
- SET+B4 (once MIDI is active) moves the starting position towards the end of the wav file.
333: Sysex sender
This is useful if you have another device that accepts sysex files, and need a portable method for updating it without a PC. It takes files from "sysex/out/" directory on SD card, allows to select one and dumps it over MIDI port. There can be up to 32 files and they need to be named with numbers at the beginning, like "01something.syx" etc., or just "01.syx", so the program can locate them. Then, you can select one of them using buttons B1/B2, and transmit it by pressing SET. The default speed is approximately 1kB/sec, this will be adjustable later. There is 2 sec delay between individual messages, to give the receiving device enough time to parse the data, in case there are more than one sysex messages combined in the file. Beginning of a message is detected by character 0xf0.
- Button B1 selects previous file. If the slot is empty (there is no file with this number found), the respective LED will blink, otherwise it will stay lit.
- Button B2 selects next file, in similar fashion.
- Button SET transmits the selected file.
1111-1114: Play the custom chord progression
Runs the user programmed composition (if defined using channel 111 or loaded using 112) with soundscapes as in 1-4.
- Sensor S1 controls delay as usual.
- Sensor S2 lowers background sample mixing level.
- Sensor S3 increases filters resonance.
- Sensor S4 adds arpeggiator effect.
- Button B1 switches between high-pass and low-pass filtering (the default varies by channel).
- Button B2 generates new random chord progression.
- Buttons B3,B4 control fixed delay and inputs as usual.
- Button SET starts binaural beats. Press repeatedly to select one of the 4 programs.
2222: Play files recorded on SD card
Plays the last recording from SD card. You can navigate to previous/next recording using buttons 1 & 2. This channel is also accessible with a shortcut - long press SET while idle. Similarly, recording is started by long press SET while something is playing.
Settings and configuration
Sensors vs Accelerometer
- 3333: Use accelerometer instead of IR sensors.
- 4444: Use IR sensors again. This can also be changed using SET-B1-B2 in the Configuration settings.
Reset back to defaults
- 4321: Should something not sound right and you are not sure what caused it, reset all settings to default (volumes, delays, inputs).
Test and service channels
Most of these channels output information over the serial port; if you plug Gecho to your PC, it will appear as a "virtual serial port" that you can interact with using PuTTY or similar terminal utility. Please check this thread for more info about the serial port settings.
- 3111: Memory info (useful for firmware debugging).
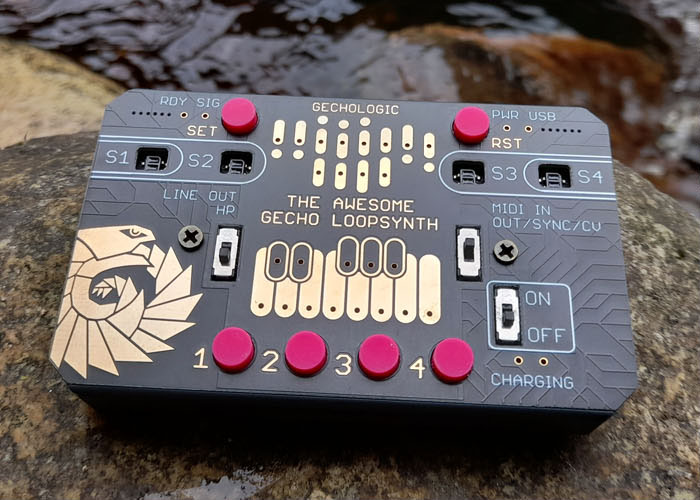
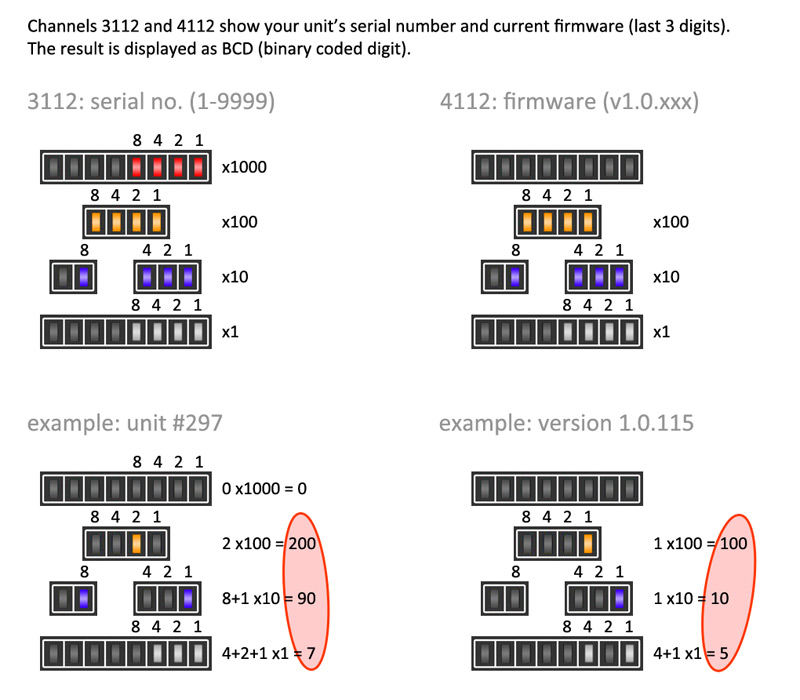
- 3112: Board serial number, also displayed with LEDs as a BCD number.
- 3113: Accelerometer test.
- 3114: Sensors test (for calibrating the firmware).
- 3121: MIDI In test (data).
- 3122: MIDI In test (hardware signals).
- 3123: MIDI Out test.
- 3124: Test all LEDs.
- 3131: Sync In test (digital hardware signals)
- 3132: Sync Out test (digital hardware signals)
- 3133: CV In test (analog hardware signals).
- 3134: CV Out test (analog hardware signals).
- 3141: SD Card info.
- 3142: SD Card speed test.
- 3143: SD Card files list.
Microphone bias level
Experimental feature. You probably do not need to adjust this. The effect of changing this voltage is a trade-off between sensitivity and ground noise level.
- 4441: Set microphone bias voltage to AVDD (typically 3.0V).
- 4442: Set microphone bias voltage to 2V.
- 4443: Set microphone bias voltage to 2.5V.
Firmware utilities
- 4111: Info about FLASH memory partition from which the current firmware runs.
- 4112: Display firmware version with LEDs as a BCD number.
- 4222: Write config to SD card.
The config file can be re-loaded using an option in service menu.
- 44112233: Load firmware update from SD card.
- 44223344: Load new config and samples from SD card (not handy for updating your unit if it is already programmed, but useful for new boards with blank FLASH, e.g. DIY builds from bare PCB). This requires "hashed" files to be stored in /factory subdirectory on the SD card (for example this config and preloaded samples). Hash is simply a SHA1 of the entire file contenct. If you just want to update the config (after editing it or when required for new firmware version), quicker method is to use the service menu.
- 44332211: Discard updates & revert to factory firmware.
Manuals

- Channels v2 1.0.118 _ gechologic.com-1669256034377.pdf
- Gecho_v2_quick_start-1669256034386.pdf
- Gecho_v2_manual-1669256034393.pdf
- Settings leaflet (explained) | gechologic.com-1669256034413.pdf
- Manual v2 | gechologic.com-1669256034435.pdf
Description
As one of the owners put it: "An art object that creates more art in the process."
Gecho is a hand-made, digital, polyphonic pocket synthesizer controlled by buttons and sensors. Whenever you power it on, it becomes a meditation tool, source of endless music from your environment... Or an amusing sound processor reacting to your voice, other instruments and various everyday objects that make sound or noise.
It is a meditative and experimental device, sampler and effect processor built rather for the experience than any serious use (although many owners have found their way).
Basically, it can run various sound engines and modulate what's going on inside with your voice, or signal from the line-in, or combination of both; this often creates interesting and unexpected results. And if the particular engine works with a sequence or a chord progression, it's also playable by MIDI. If you intend to use it in making music, probably the most useful thing you can do is to find interesting sounds and record them into DAW or a sampler.
With default settings, it generates pleasant soundscapes like it's predecessors, classic Gecho V1 and Glo... But if you are willing to dig deeper, there are many ways how to configure it to do what you need.
Notes
Serial: 1224