DigiTech RP3 Preamp / Multi-Effects Processor & Controller
Quick Start
For those of you who prefer to burn now and read later, we've included this Quick Start section to get you up and running.
Connect Cables
Connect guitar into the Input jack (located on the rear of the RP-3). Connect the Output(s) of the RP-3 to the Input of the either the Guitar Amp, Power Amp or Mixing board.
Apply Power
Note: It is recommended that the <Output> knob be turned down prior to powering up the RP-3.
Adjust Output
Now adjust the <Output> level knob on the rear panel of the RP-3 to the desired output level.
Adjust Presence
The <Presence> knob will act as a quick EQ. Use this knob to fine-tune your tone by turning clockwise (Brighter tone) or counter-clockwise (Darker tone).
Select Preset
Begin playing your guitar, and choose any preset by either pressing the Value <UP> or the <Down> buttons or by pressing the <UP> and bank <DOWN> footswitches.
Jam-Along and Learn-A-Lick
The RP-3 will let you mix a CD or Cassette tape signal with the signal of the RP-3 so that you can play along with the music, or use the Learn-A-Lick function for recording and playing back sections of music and play it back at varying speeds without changing pitch. Simply connect the CD or Cassette headphone output into the Jam-Along jack (located on the rear of the RP-3).
A Quick Tour of the RP-3
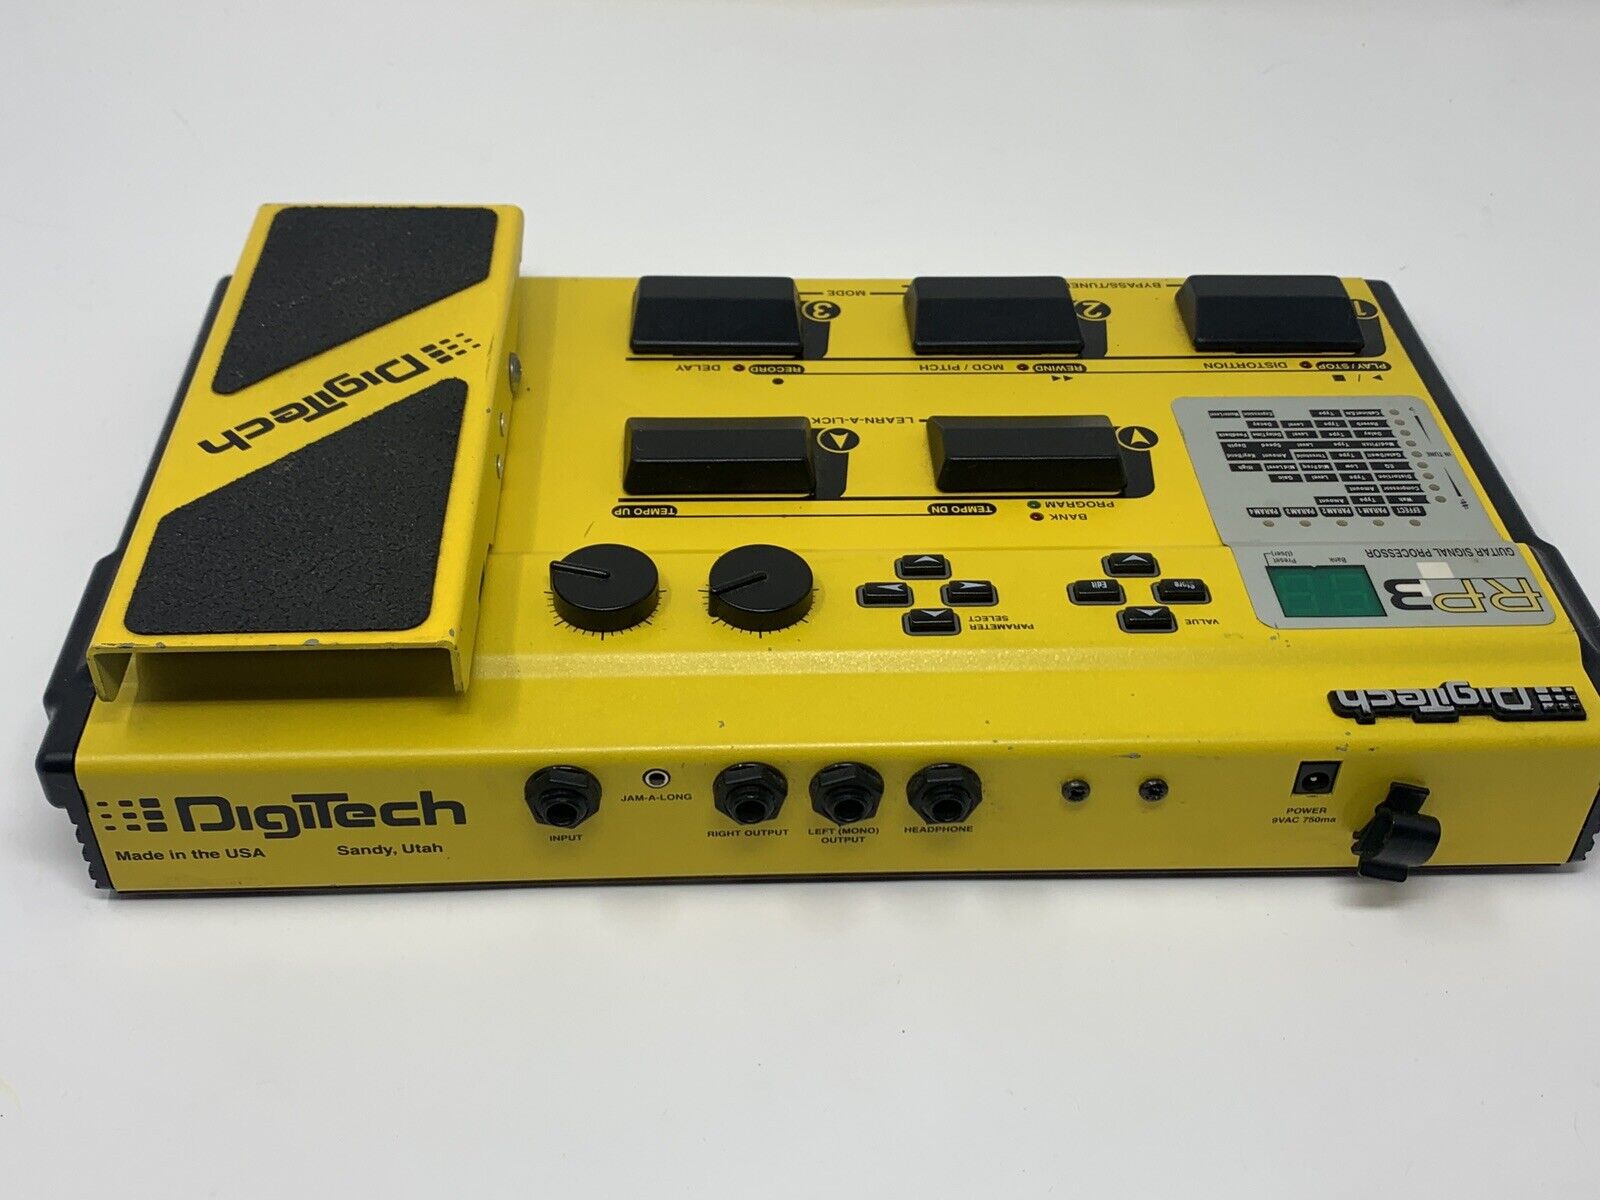
The Front Panel
- Pedalboard - The RP-3's pedalboard consists of five footswitches. The two Mode footswitches (
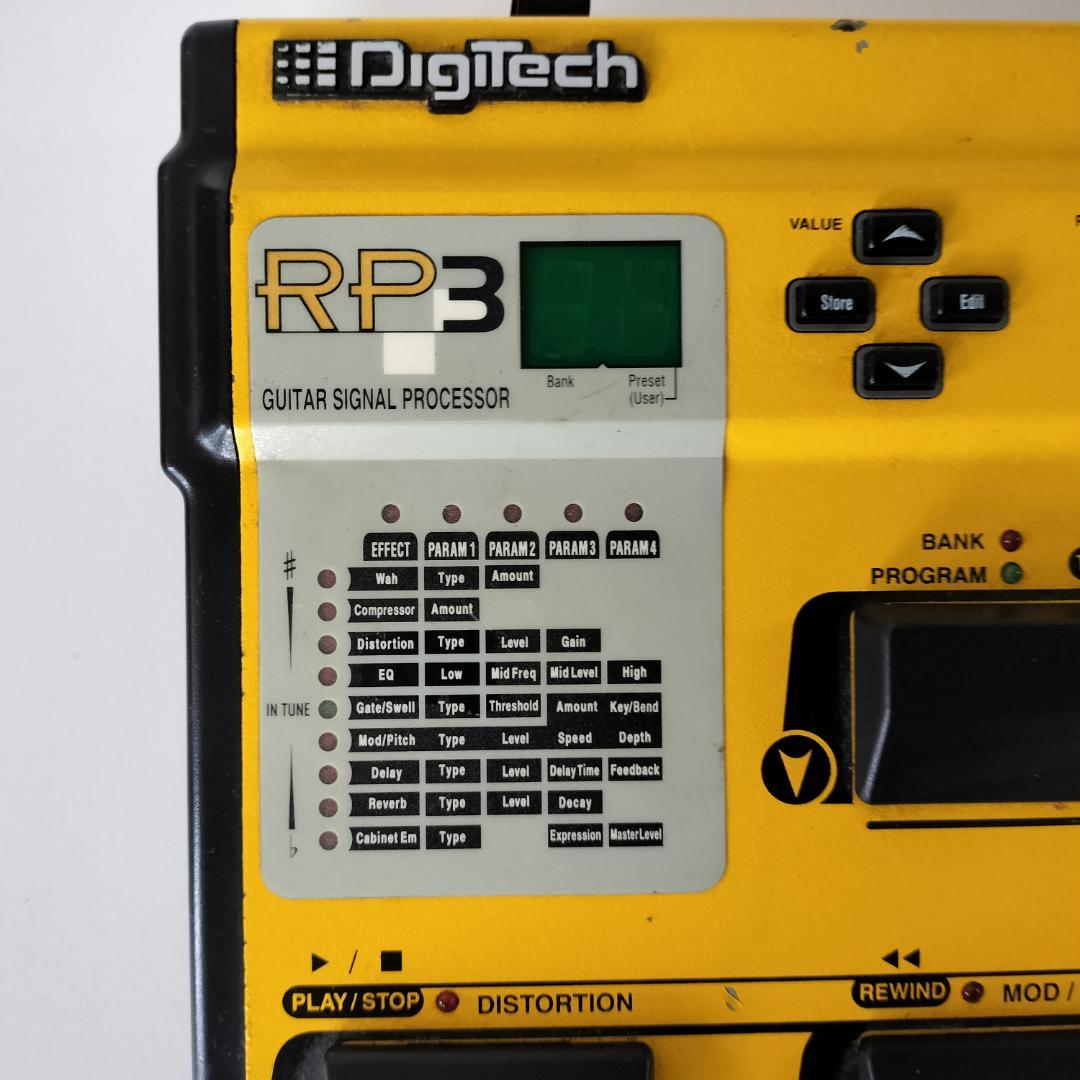
<2>and<3>), allow you to change from Program mode to Bank mode by pressing them simultaneously. When changing modes, the appropriate mode LED will light to indicate whether you are in Program mode or Bank Mode. In Program Mode, the<UP>and<DOWN>footswitches allow you to move through Programs, while the three main switches, labeled <1 - 3>, act as toggle On / Bypass switches for Distortion, Mod/Pitch, and Delay. In Bank mode, the<UP>and<DOWN>footswitches allow you to move through Banks, while the<1-3>footswitches are used to select Programs. If footswitches<1>and<2>are pressed simultaneously, Bypass Mode will be activated. If footswitches<1>and<2>are pressed and held simultaneously, Tuner mode will be activated. If the<UP>and<DOWN>footswitches are pressed simultaneously, Learn-A-Lick mode is activated. - Parameter Matrix - The Parameter Matrix consists of a group of vertical effect LEDs and a second group of horizontal parameter LEDs. The Effect LEDs are: Wah, Compressor, Distortion, Equalization, Gate/Swell, Mod/Pitch, Delay, Reverb, and Cabinet Emulator. This matrix shows you exactly what effects and parameters are in use or selected.
- Display Window - The display window shows all current operating and programming information. The right decimal in the lower right hand corner of the display window indicates you are in a User (U) bank. The first number indicates the Bank number currently in use, and the second number indicates which Program number is currently in use. These numbers will change as you scroll through the available Programs.
- Value, Store and Edit Buttons - The Value
<UP>and<DOWN>buttons allow you to scroll through the RP-3's Programs, or change Parameter values in Edit mode. The<STORE>button allows you to store an edited Program in memory for later use. The<EDIT>button allows you to edit the User and Factory Programs. - Mode LEDs - Indicates whether the RP-3 is in Program or Bank mode.
- Parameter Select Buttons - The
<LEFT>and<RIGHT>Parameter buttons allow you to navigate the horizontal parameter LEDs of the Parameter matrix. The<UP>and<DOWN>Parameter buttons allow you to navigate the vertical effect LEDs of the Parameter matrix. These keys are only active in Edit mode. - Output Level - Controls the overall output level of the RP-3. Also controls the overall level of the headphones.
- Presence - Enhances the high frequency content of the overall sound. This will affect all presets.
- Expression Pedal - This volume-type pedal allows real time control over Parameters in the RP-3.
The Rear Panel
- Input - Plug in your instrument here.
- Jam-A-Long Jack - Connect a CD or Cassette player headphone output here for either Jam-A-Long or Learn-A-Lick use. Uses a standard 1/8" stereo plug.
- Right Main Output - This is the RP-3's right main audio output. Use both left and right main outputs to take advantage of stereo effects.
- Left (Mono) Output - This is the RP-3's left main audio output. This output should be used when using only one output.
- Headphone Output - 1/4" stereo plug for headphones. The headphone level is controlled by the main output level knob.
- AC Line Input - This is the AC power adapter receptacle. Use only the included PS 750 power supply.
- Strain Relief Clip - This holding clip is used to secure included power supply cord.
Making Connections
Your RP-3 can be connected in several different ways to meet the requirements of specific applications. The following diagrams offer some different ways your RP-3 can be connected.
For those of you out there that feel that "bigger is better", this set-up should work quite nicely for you. First plug into the input of the RP-3. Connect both RP-3 outputs into the inputs of both of the amplifiers. Using a set-up such as this will let you produce guitar tones with lots of body. This is also a great set-up to produce lush and thick stereo effects.
The RP-3 provides you with a Cabinet Emulator for running direct to a mixing board. A set-up such as this, will give you the ability to run directly to the mixing/recording board. To help ensure great recording tones, use the Speaker Cabinet emulator that is located in the RP-3. The first thing you will want to do when using this set-up is, first run into the Input of the RP-3. Then run out of both of the Outputs into 2 inputs on the mixing board and pan each channel hard left and hard right. Now to use the Cabinet emulator, simply press the <Edit> button and then use the Parameter select buttons to move you through the Effects matrix until you reach the Cabinet emulator effect. The Parameter select buttons and the Value buttons will help you fine-tune the Cabinet emulator.
Basic Operations - About the RP-3's Modes
The RP-3 offers several modes, allowing easy operation of the Effects and Parameters. The modes are as follows:
PROGRAM MODE
Allows you to scroll through the 30 Factory and 30 User Programs by using the Value <UP> and <DOWN> buttons as well as the <UP> and <DOWN> foot switches. Select Program mode from Bank mode by pressing the <2> and <3> foot switches simultaneously until the Program Mode LED lights and a P appears briefly in the display window. Foot switches <1-3> act as on / off toggle switches for the specified effects.
BANK MODE
Allows you to scroll quickly through Factory and User Banks by using the <UP> and <DOWN> foot switches. Select Bank mode by pressing the <2> and <3> foot switches simultaneously until the Bank LED lights and a B appears briefly in the display window. When you enter Bank mode, the Bank and Program numbers from the previous mode will be retained. When a program number is displayed in the display window, you can also use the Value <UP> and <DOWN> buttons to scroll through Programs and Banks.
When the <UP> and <DOWN> footswitches are used in Bank mode, you will scroll through Banks only. When you change a Bank using this method, the previous Program number is not displayed with the new Bank. The LEDs above foot switches <1-3> will begin flashing, indicating that you can choose a Program in the selected Bank by pressing one of the three foot switches. Once a program number has been selected, both the Bank and Program numbers will be displayed.
EDIT MODE
Allows you to modify effect Parameters in a program. Enter Edit mode by pressing the <Edit> button. The display window now shows the value of the Parameter indicated by the LEDs in the matrix. You can scroll through the Parameter matrix using the Parameter Select buttons. The Parameter Select <UP> and <DOWN> buttons allow you to scroll through the vertical effect LEDs, while the <LEFT> and <RIGHT> buttons allow you to scroll through the horizontal parameter LEDs.
After selecting a Parameter, you can change its value with the Value <UP> and <DOWN> buttons. When changing Parameter values, a decimal point will begin flashing in the lower right corner of the display when the value shown is not the stored value for the program. If you return to the original value, the decimal point will stop flashing. If you exit Edit mode after changing the Parameters and then return to Edit mode, the last viewed Parameter will be displayed.
STORE MODE
Once you have modified the Parameters and Effects, you can store them to a User Program location. When Effects or Parameters have changed in a Program, the decimal point in the lower right corner of the display will flash, indicating a change and you need to store the changes. Press the <Store> button once and the both of the seven segment LEDs in the display window will flash. Select the User bank and program location you want using the Value <UP> and <DOWN> buttons and press the <Store> button again to save the changes.
BYPASS MODE
Allows you to bypass the RP-3's Effects. Enter this mode by pressing footswitches <1 & 2> simultaneously and BY will appear in the display window to indicate you are in Bypass mode. Exit this mode by pressing any of the footswitches. When you exit this mode, the RP-3 will default to the last mode you were in.
TUNER MODE
Allows you to tune your guitar. Enter Tuner mode by pressing and holding footswitches <1 & 2> simultaneously. Now tu will appear briefly in the display window followed by: -- to indicate that you are in Tuner mode. To begin tuning, play a note on your guitar (a harmonic at the 12th fret will work best). The display window will show the note being played and the vertical effects matrix LEDs (tuning bar) will light. Once the green LED on the tuning bar is lit, the note is in tune. If the note is not in tune, 1 or 2 of the LEDs above or below the green IN TUNE LED will be lit. If LED's below are lit, the note is flat and should be tuned up. If the LEDs above are lit, the note is sharp and should tuned down. You can change your tuning preference by using the Value <UP> and <DOWN> buttons while in Tuner mode. The default factory setting is: 40 A = 440Hz. The tuning reference control ranges from 27 (427Hz) to 53 (453Hz), which is the equivalent of ±50 cents (1/2 semitone) in either direction form 440 Hz.
When you scroll down from 27 (427) Hz, you will also find alternate dropped tunings. Alternate tunings are A = Ab ((ab), A = G (g), and A = Gb (gb). The display window will briefly flash the currently selected tuning preference.
Exit this mode by pressing any one of the footswitches. When you exit this mode, the RP-3 will default to the last mode you used.
LEARN-A-LICK MODE
The Learn-A-Lick function allows you to record a 12 second passage of music and play it back as slow as 1/4 speed with no change in pitch. This is very useful for picking out the notes of a fast solo passage. There are 3 functions for Learn-A-Lick. They include:
- Start / Stop
- Rewind
- Record
Using Learn-A-Lick
- Connect the headphone output of your CD or tape player to the Jam-a-long input jack on the rear panel using an 1/8" stereo plug. Set the level to a desired listening level using the CD or tape player volume control.
- Press the
<UP>and<DOWN>footswitches simultaneously to enter Learn-a-lick mode. - Cue up to the passage you want to record and hit pause on the CD or tape player.
- Release the pause button and press the
<3>foot switch together when you are ready to begin recording the passage. The display will read:rEand recording will begin. When recording is completed, the phrase is set into an auto-loop playback mode. Stop or press pause on the CD or Tape player. - Pressing the
<TEMPO DN>foot switch will slow the playback down to 1/4 speed in 1/8th speed intervals. - Pressing the
<TEMPO UP>foot switch will increase the playback speed to normal speed at 1/8th speed intervals. - Pressing the
<REWIND>foot switch steps back through the loop at 1 second intervals. - The Expression pedal will control output level of auto loop.
- To re-record a passage, press the
<RECORD>foot switch again. - To exit the Learn-A-Lick mode, press the
<UP>and<DOWN>footswitches simultaneously
Effects & Parameters
About the Parameter Matrix
The Parameter matrix displays all the effects and parameters available in the RP-3. The parameters are arranged in rows and columns. Use the Parameter select keys to navigate the matrix. The effects and their parameters are as follows:
Wah
The RP-3 offers a classic wah wah effect, which can be used with or without distortion for that classic wah-wah sound. The effect can be controlled with the expression pedal.
Wah Turns the Wah on and off.
Type The Wah types include; 1. being full-range and 2 through 7 move from darker to lighter tones.
Amount This parameter is a manual setting to control the wah effect. This parameter can be modified manually using the RP-3's parameter keys to perform the wah function. As the parameter is modified, the tone of the original note will change. Ranges 0 to 99.
Compressor
The RP-3's Compressor can be used to increase sustain and to tighten up guitars, and is particularly useful on clean sounds. Parameters of the RP-3 compressor are as follows:
Compressor Turns the Compressor on or off.
Amount Controls the amount of compression applied to the signal. Higher settings yield a tighter, more focused sound, while lower settings allow better dynamics. Ranges from 1-Lo to 96-Hi.
Distortion
The distortion section of the RP-3 has two extremely flexible distortion types, capable of producing the smoothest of blues tones to the full shred gain of a hot-rodded amp.
Distortion Turns the Distortion on or off.
Type Selects the type of distortion voicing used. Gr (Grunge) is an over the top high gain distortion which provides a high amount of sustain and od (Overdrive) is a low to medium gain distortion.
On/Bypass Level Sets the output level of the Distortion when the effect is On or Bypassed. Ranges from 0 to 99. The On level is displayed when distortion is on and Bypass level is displayed when distortion is Off.
Gain Controls the amount of distortion produced by the RP-3. High settings produce greater gain and drive for effortless soloing, while low settings offer better nuance and dynamic control. Ranges from 1.0 to 11.
Equalizer
The RP-3 offers a Three-band equalizer. The center frequency of the Mid band is adjustable along with its gain (boost or cut).
Equalizer Turns the Equalizer on or off.
Mid Frequency Allows you to select the center frequency of the Mid band. Mid Band ranges from 0.1 to 16 (100 Hz to 16 kHz).
Gain Low, Mid, High Allows you to boost and cut the frequency. Ranges are from -15 to 15.
Gate / Swell
The RP-3's Silencer offers you a professional quality digital noise reduction effect.
Gate/Swell Turns the Gate on or off.
Type Controls how fast the Silencer gate opens after detecting a signal above the threshold. Large numbers yield longer swell times, while small numbers give a fast attack. Varies from 1-20 (2 seconds).
Threshold Sets the level at which the Silencer gate will open. Ranges are Lo and High.
Mod / Pitch
The RP-3's multi-function Mod / Pitch module, will allow you to select effects such as; Chorus, Flanger, Phaser, Tremolo, Panner, Pitch Shift, Whammy, and Harmony effect. The parameters of these effects are adjusted in this module.
Mod / Pitch Turns the Module on or off.
Type Allows you to select a specific type of modulation / pitch effect. The Types are; Chorus, Flanger, Phaser, Tremolo, Panning, Pitch Shifting, Whammy (Bend), and Harmony.
Level Controls the overall mix level of the mod or pitch shifting effect. Ranges from 0 to 99.
Chorus
The RP-3 offers a chorusing effect that is unique in both character and sound. This dual chorus offers exceptionally rich chorusing using multiple voices with different phasing characteristics. Chorus parameters are as follows:
Speed Controls the speed of the chorus sweep. Ranges from 0 to 99.
Depth This parameter sets the sweep depth (intensity) of the chorus. Ranges from 1 to 99.
Flanger
The RP-3 also offers exceptionally rich flanging. Flange parameters are as follows:
Speed Controls the speed of the flange sweep. Ranges from 0 to 99.
Depth / Regeneration Sets the depth amount and regeneration present in the flange effect. Ranges from 1 to 99.
Phaser
The RP-3's classic adjustable phase shifting effect is reminiscent of mid-70's keyboard and guitar sounds.
Speed Controls the speed of the phase sweep. Ranges from 0 to 99
Depth / Regeneration Sets the sweep depth (intensity) and regeneration of the phaser. Ranges from 1 to 99.
Tremolo
Tremolo was one of the first real effects, and appeared mostly on early guitar amplifiers. Because of this, Tremolo is sometimes perceived as sounding "old" or "vintage". The RP-3, breathes new life into this classic effect, providing totally transparent volume modulation of sound sources.
Speed Controls the tremolo speed (speed of modulation). Ranges from 0 to 99.
Depth Adjusts the intensity of the tremolo effect. Ranges from 1 to 99.
Auto Panning
An auto panner is a modern relative of the tremolo that modulates the sound from left to right at a given rate. Parameters are as follows:
Speed Controls the panning speed (speed of modulation). Ranges from 0 to 99.
Depth Adjusts the intensity of the panning effect. Ranges from 1 to 99.
Pitch Shifting
This RP-3's Pitch Shifting effect gives you a shifted signal from 0 to 24 semi-tones above or -12 semi- tones below the pitch of the input signal.
Amount Sets the interval between the original note and the pitch shifted note. Variable from -12 to 24.
Key / Bend Determines the amount of detuning applied to the shifted note. Variable from -15 to 15.
Pitch Bending / Whammy
The RP-3's pitch bending effect allows you to smoothly shift between two preset pitch intervals using the Expression Pedal.
Amount Selects the function of the Whammy module. There are 16 bend ranges available in the Whammy module. They are as follows:
- Up 1 Octave
- Up 2 Octaves
- Down 2nd Reversed
- Down 2nd
- Down 4th
- Down 1 Octave
- Down 2 Octaves
- Down 6 Octaves
- Down 1 Oct - Up 1 Oct
- Down 4th - Down Minor 3rd
- Up 5th - Up 6th
- Up 4th - Up 5th
- Up Minor 3rd - Up Maj 3rd
- Up 2nd - Up Maj 3rd
- Down 4th - Up 5th
- Up 5th - Octave Up
Key / Bend This Parameter is a manually selectable bend amount of the Whammy effect. As it is modified, the pitch of the original note will change in intervals according to the setting of the Amount parameter. Ranges from 0 to 99.
Harmony
The RP-3 also offers Intelligent Harmony Pitch Shifting that lets you select the key, scale and amount of shifting in the signal. The parameters are as follows:
Type This parameter lets you select the scale that the Harmony effect uses. There are six different scales and they are numbered as follows: H1- Major, H2- Minor, H3 - Harmonic Minor, H4 - Dorian, H5 - Mixolydian, and H6 - Blues.
Amount Amount lets you select how much the pitch is shifted. This Ranges from: Octave down-Octave Up
Key / Bend This parameter lets you select which key the harmony shifting takes place in. This ranges from: A♭ to G.
Note: The reverb and Wah effects are not available when the Harmony effect is selected. For complete reference guide to these scales, please refer to the Harmony interval charts located in the Appendix section.
Delay
Delay Parameters are as follows:
Delay Turns the Delay on and off.
Type Determines the type of delay. Type 1 is a mono delay and Type 2 is a ping pong delay.
Level Controls the level of the delay. 2. Ranges from 0 to 99
Delay Time The available delay time ranges are 1 (no delay) to 3.5 seconds.
Feedback The number of delay repeats. Ranges from 0 to 99 and rh (repeat / hold).
Reverb
Ambience, or reverberation, is produced when sound energy is reflected off room surfaces and objects. Using reverb in recorded program material gives the listener a sense that the material is being performed in an actual room or hall. It is this similarity to actual acoustic spaces that makes reverberation a useful tool in recorded music. Reverb Parameters and their functions are as follows:
Reverb Turns the Reverb effect on or off.
Type Allows you to choose your ambience or setting you want to use. There are ten available type settings:
CL= ClubSt= Studioro= RoomPL= PlategA= GarageHA= HallCh= ChurchAr= ArenaSp= Spring
Level Controls the amount of reverb signal to be mixed in with the dry signal. Ranges from 0 to 99.
Decay Time The amount of time it takes for the Reverb to fade to inaudibility. Ranges from 1 to 10.
Cabinet Emulator
The RP-3's programmable Speaker Cabinet circuitry allows you to use it in both recording and live situations without lugging heavy amps and/or cabinets around. Just connect the RP-3's outputs to a mixing console and kick in the Speaker Cabinet. Parameters are as follows:
Cabinet Turns the Cabinet Emulator on or off.
Type Selects the tonal characteristics of the simulated cabinet. There are 9 different cabinet types; 1 being the brightest and 9 being the darkest.
Note: When headphones are plugged in, the Speaker Cabinet Emulator is engaged globally on all programs. This will affect the sound at the left and right main outputs.
Expression Pedal
The RP-3's Expression pedal allows you to control various parameters in real time during performance.
Expression There are eight parameters that can be controlled by the Expression Pedal. AH = Wah, SP = Speed, dE = Depth, bd = Whammy, Fb = Delay Feedback, L1 = Pre Effects Volume, L2 = Post Effects Volume.
Master Level
The RP-3's Master Volume controls the overall volume level of the selected program. The level can be controlled with the Expression pedal for balancing levels in real-time during live performance. One of two level types can be linked to the Expression pedal, L1 is a pre effects volume and L2 is a post effects volume.
Master Level Controls the overall program level. Variable from 0 to 99.
Appendix
Reinitializing the RP-3
This option allows you to restore the contents of the RP-3's memory to the original factory condition and to calibrate the expression pedal. WARNING: Performing this function will destroy all user-programmed data. All such data will be lost forever!
To restore the factory Programs, the procedure is as follows:
- Plug in the RP-3 while holding down the Parameter Select
<UP>button. - When:
rSappears in the display window, press the Value<UP>button - The display will now prompt you to calibrate the Expression pedal by reading:
PdandCA. - When the display reads:
to...dn, rock the pedal forward and press any one of the<1-3>footswitches. - When the display reads:
to...UP, rock the pedal back and press any one of the<1-3>footswitches. The expression pedal will now be calibrated and the RP-3 will return to program mode.
Recalibrating the Expression Pedal
If the expression pedal should for some reason need to be recalibrated, you can recalibrate by disconnecting the power, press and hold the Parameter select <DOWN> button and repeat steps 3-5 as shown in the Re-intialializing the RP-3 section above.
Harmony Interval Chart
See PDF
Specifications
- A/D Converter: 20 bit
- D/A Converter: 20 bit
- Sampling Frequency: 40 kHz
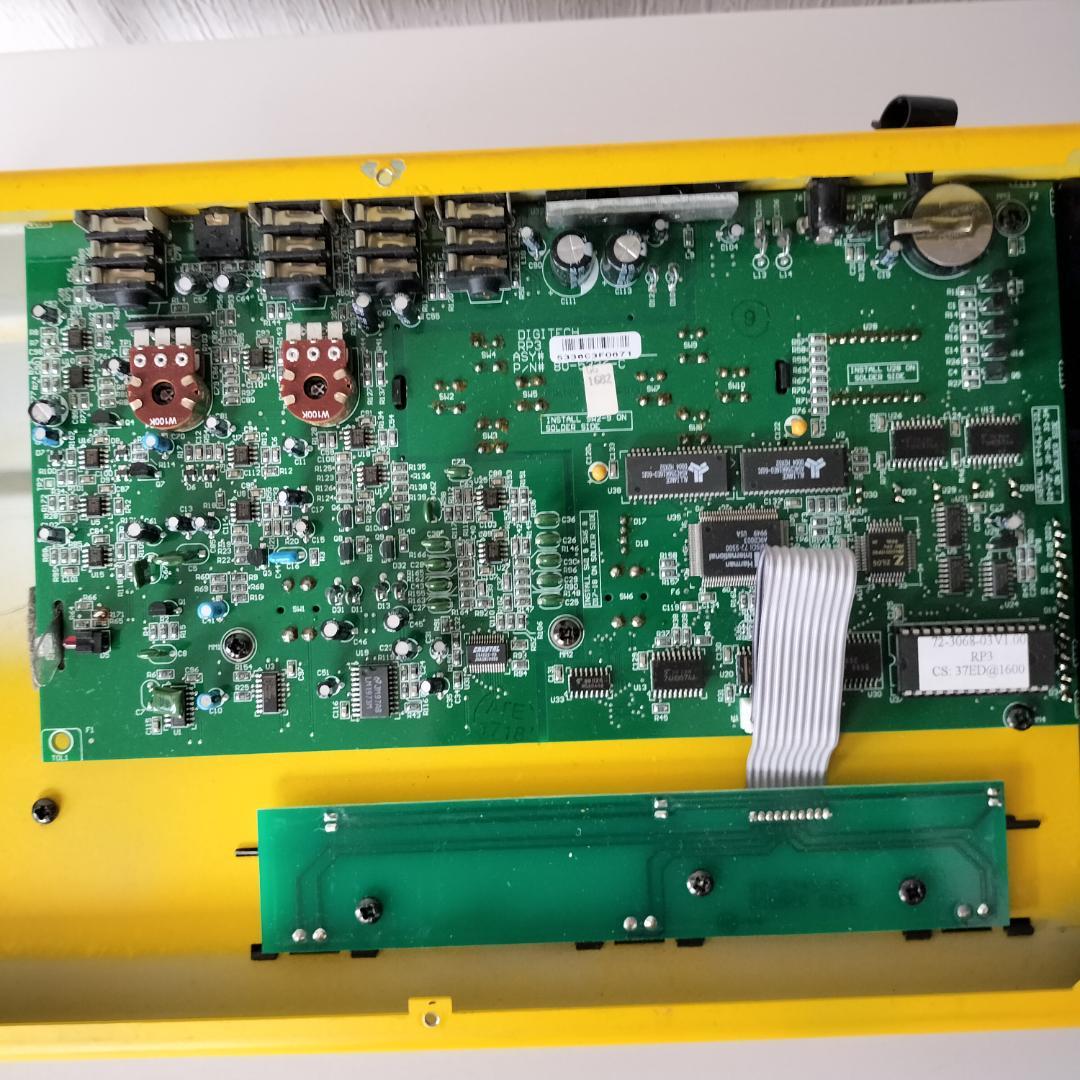
DSP Section:
- Architecture: Static-Dynamic Instruction Set Computer (S-DISCTM)
- Digital Signal Path Width: 24 bits (144.5 dB)
- Internal Data Path Width: 48 bits (289 dB)
- Dynamic Delay Memory: 256k x 24 bits (3.5 seconds)
- Static Delay Memory: 256 24-bit registers (6.55 milliseconds)
- Data ALU Processing: 10.0 MIPS
- Address ALU Processing: 15.0 MIPS
- Multiplier Size: 24 bits x 24 bits
Input Section:
- Connector: 1/4" Unbalanced TRS
- Nominal Level: -8 dBu
- Maximum Level: +10 dBu
- Impedance: 470 kohms
Output Section:
- Connector: 1/4" TRS
- Nominal Level: +4 dBu
- Maximum Level: +18 dBu
- Impedance: 50 ohms
General:
- Frequency Response: 20 Hz. - 20 kHz. +0, -3 dB
- S/N ratio: Greater than 90 dB; ref = max signal, 22 kHz measurement bandwidth
- Total Harmonic Distortion: Less than 0.04% (1 kHz.)
- Memory Capacity: Factory: 30 Programs, User: 30 Programs
Power Requirements:
- US and Canada: 120 V AC, 60 Hz
- Japan: 100 V AC, 50/60 Hz
- Europe: 230 V AC, 50 Hz
- UK: 240 V AC, 50 Hz
- Power Consumption: 12 watts
- Dimensions: Length 14.6” Width 8.75” Height 2.75”
Preset List
The following is a list of all the factory Programs in the RP-3.
Bank 0 Showcase
- 0-1 Solo Time
- 0-2 Clean Phasor
- 0-3 Thick Rhythm
Bank 1 Heavy
- 11 Crusher
- 12 Bad Boy
- 13 Metal Flange
Bank 2 Blues
- 21 Bold Blues
- 22 Blue Slide (Expression Pedal)
- 23 Chicago Shuffle
Bank 3 Studio
- 31 Studio Rhythm
- 32 Spankin' Clean
- 33 Greasy Solo
Bank 4 Country
- 41 Chicken Slap
- 42 Pedal Steel (Expression Pedal)
- 43 The Tremolo
Bank 5 Modern
- 51 Whammy Head
- 52 To the Wall
- 53 Phase-Delic
Bank 6 Retro
- 61 Surfer Dude
- 62 80's Pop
- 63 Classic Wah
Bank 7 Jazz / Fusion
- 71 Jazz Club
- 72 Fingerstyle with Bass
- 73 Fusion Solo
Bank 8 Rock
- 81 Rock Tone
- 82 Chorused Clean
- 83 Tray Catz
Bank 9 Special
- 91 2 Second Jam Loop (Expression Pedal)
- 92 Envelope Swell
- 93 E Minor Solo
Files
Assets