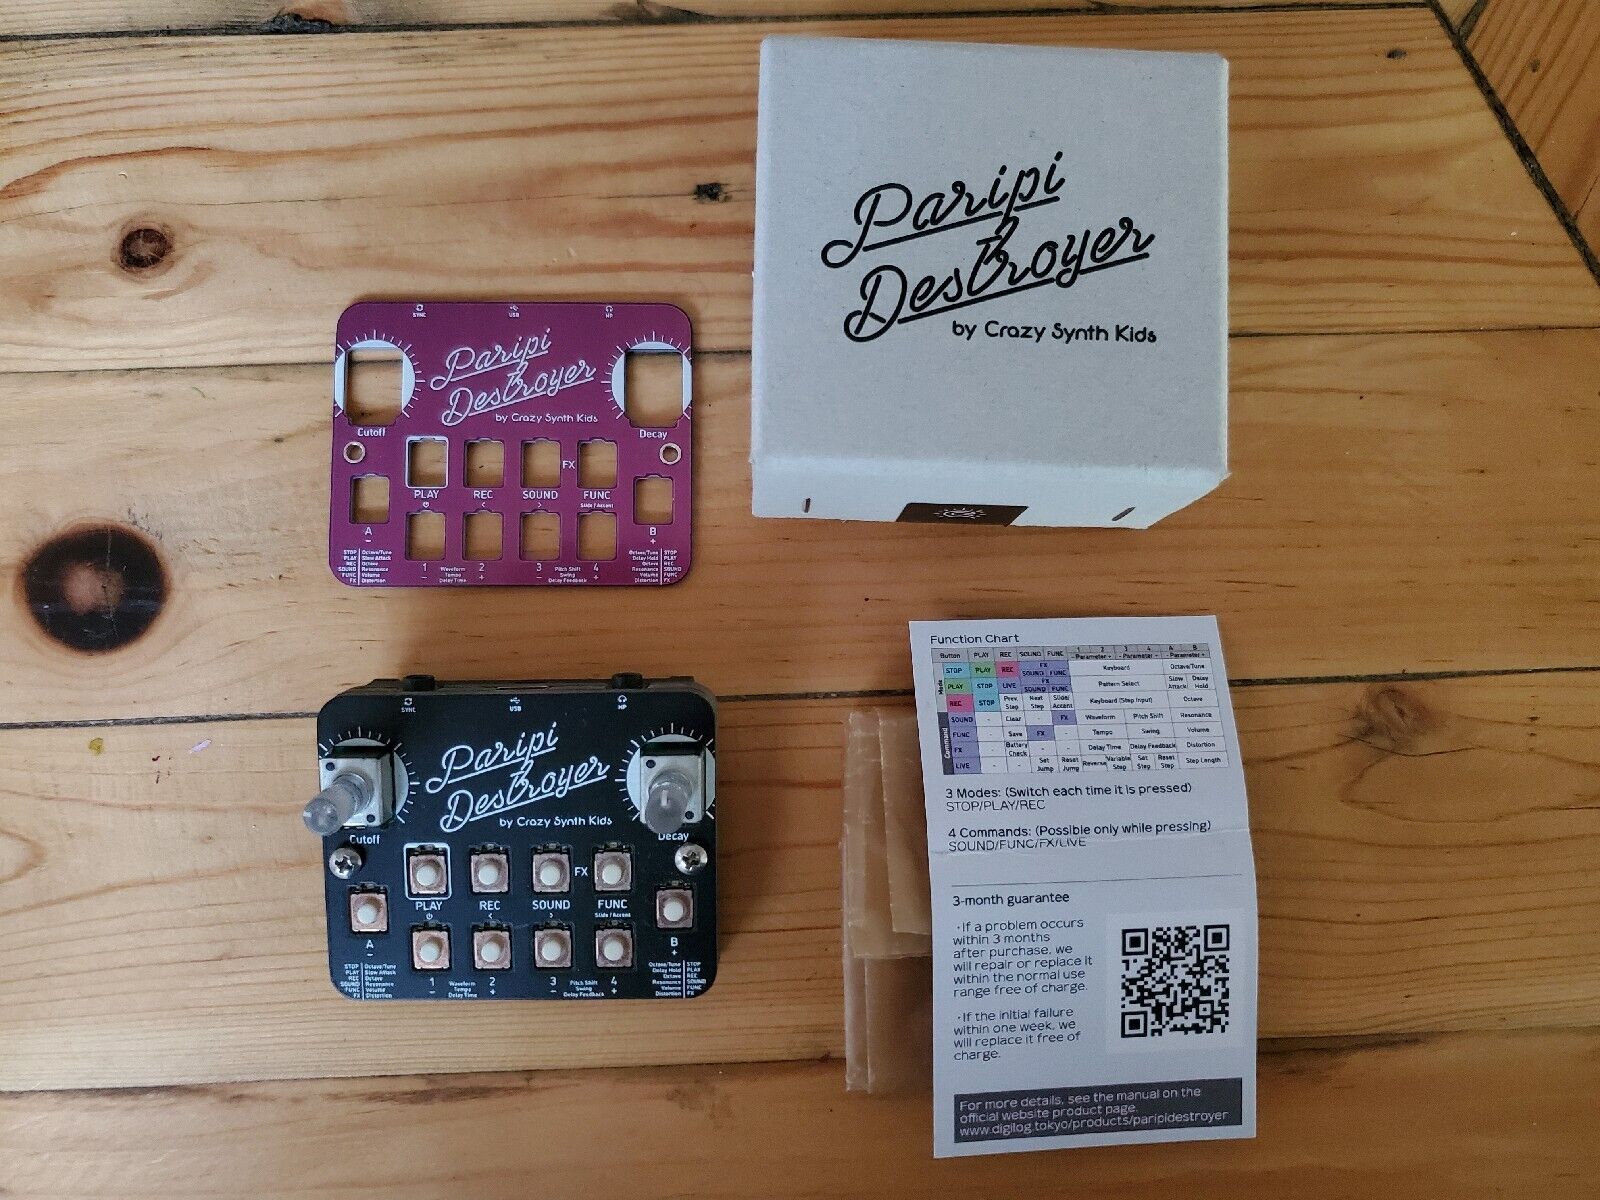
Paripi Destroyer - Crazy Synth Kids
from MoeShop Jam
Overview
The Palipide Destroyer is a palm-sized compact machine that combines a 16-step sequencer, monophonic bass synth sound source, and delay and distortion effects. It runs on a single AAA battery and has a built-in speaker so you can play anytime, anywhere.
Basic Specifications
| Attribute | Value |
|---|---|
| Sound Source Configuration | 1VCO / 1VCF / 1VCA / 1EG (Virtual Analog / Monophonic) |
| Waveform | Triangle / Saw / Super Saw / Square Saw / Square1 / Square2 / Square3 / PWM |
| Effects | Distortion / Delay |
| Keyboard | 4 keys (Pitch Editable) |
| Sequencer | 16 Steps / 4 Patterns |
| Output Terminals | Headphone / LINE Output (3.5mm mini jack) |
| Input Terminal | SYNC Terminal (3.5mm mini jack) |
| Power Supply | AAA Alkaline Battery (1.5V) x1 or USB-C (5V/500mA) |
| Power Consumption | Max 1.25W |
| Size | W64mm x L54mm x H38mm |
| Weight | 48g (main unit only) / 59g (main unit + battery) |
Notational Conventions
Conventions used in this manual
Button / Knob
- Buttons and knobs are written in bold and enclosed in square brackets.
- Example: PLAY button, works every time you press it (latch action) ➜
[PLAY] - Example: Cutoff knob ➜
[Cutoff]
- Example: PLAY button, works every time you press it (latch action) ➜
- Buttons that must be held down are also enclosed in parentheses.
- Example: Press and hold the SOUND button, it works only while it is pressed (momentary action) ➜
[[SOUND]]
- Example: Press and hold the SOUND button, it works only while it is pressed (momentary action) ➜
- If there is a specified time or number of times specified, the time will be written in parentheses.
- Example: Press and hold the PLAY button for 1 second ➜
[[PLAY]](1sec.) - Example: Press and release the REC button twice ➜
[REC](x2)
- Example: Press and hold the PLAY button for 1 second ➜
Lamp / LED / Light
It is written in bold and enclosed in arrow brackets (greater than / less than).
Example: PLAY lamp ➜ <PLAY>
Mode Command
Bold and capitalized. Example: STOP mode ➜ STOP mode
Parameter
It is written in bold. Example: Resonance ➜ Resonance
Set Value
Bold and italic.
Example: Bypass ➜ Bypass
AND
When dealing with more than one action at the same time, join them with a plus sign + and write them together.
It is order sensitive and operates from left to right.
Example: Hold down the SOUND button and press the 1 button ➜ [SOUND]+[1]
OR
When dealing with one of multiple, separate them with a slash mark.
Example: Press SOUND button or FUNC button ➜ [SOUND]/[FUNC]
Enumeration
When listing three or more items, abbreviate them in the order PLAY / REC / SOUND / FUNC / 1 / 2 / 3 / 4 / A / B / Cutoff / Decay.
Example: Lamp from <PLAY> to <B> → <PLAY>~<B>
Quick Start Guide
Power
Press and hold [PLAY] for about 1 second to turn on. Press and hold for about 2 seconds to turn off.
Sound
Knobs

Twist [Cutoff] and [Decay] to align the indicator (groove) on the knob to the center of the scale.
If [Cutoff] is minimized (all the way to the left), no sound will be heard.
Keyboard
Immediately after turning on the power, it is in STOP mode. In STOP mode, [1]-[4] become the keyboard keys, pressing any of them will make a sound.
Sequencer
Press [PLAY] to switch to PLAY mode and start playing the sequence. Press [PLAY] again to stop the sequence and return to STOP mode.
The initial sequence will be played at first startup or if you have not saved the sequence.
Adjust Parameters
Here, we will explain how to enter commands to adjust various parameters, using Volume as an example.
Volume can be adjusted by pressing [A]/[B] while pressing [FUNC] while in STOP mode or PLAY mode.
Check the Current Volume
While [FUNC] is pressed, the lamps <A>/<B> above [A]/[B] indicate the current Volume value.
Lower the Volume
Hold down [FUNC] and press [A] to decrease the volume by one step.
By holding down [FUNC] and pressing [A] repeatedly, you can continuously decrease the Volume .
Turn Up the Volume
Hold down [FUNC] and press [B] to increase Volume by one step.
By holding down [FUNC] and pressing [B] repeatedly, you can increase the volume continuously.
If you want to adjust other parameters, please refer to and do the same operation with the target mode/button.
Input the Sequence
Switch to REC mode
Press [REC] while in STOP mode to switch to REC mode. If the sequence is playing, you are in PLAY mode. Press [PLAY] to switch to STOP mode, then press [REC].
Record the Sequence
In REC mode, [1] to [4] function as a keyboard for sequence recording, and each time you press one, the sequence is input one step at a time. When [PLAY] is pressed or the input reaches 16 steps[1] the REC mode ends and the sequence starts playing.
Only when AutoPlay in Global Options is ON.
Adjust Octave
During sequence input in REC mode, pressing [A] selects an octave lower, and pressing [B] selects an octave higher. Subsequent keyboard presses will input the sequence in the selected octave. It doesn't step while adjusting the octave, it only steps when you press a key on the keyboard.
Simplified Charts
Function Chart
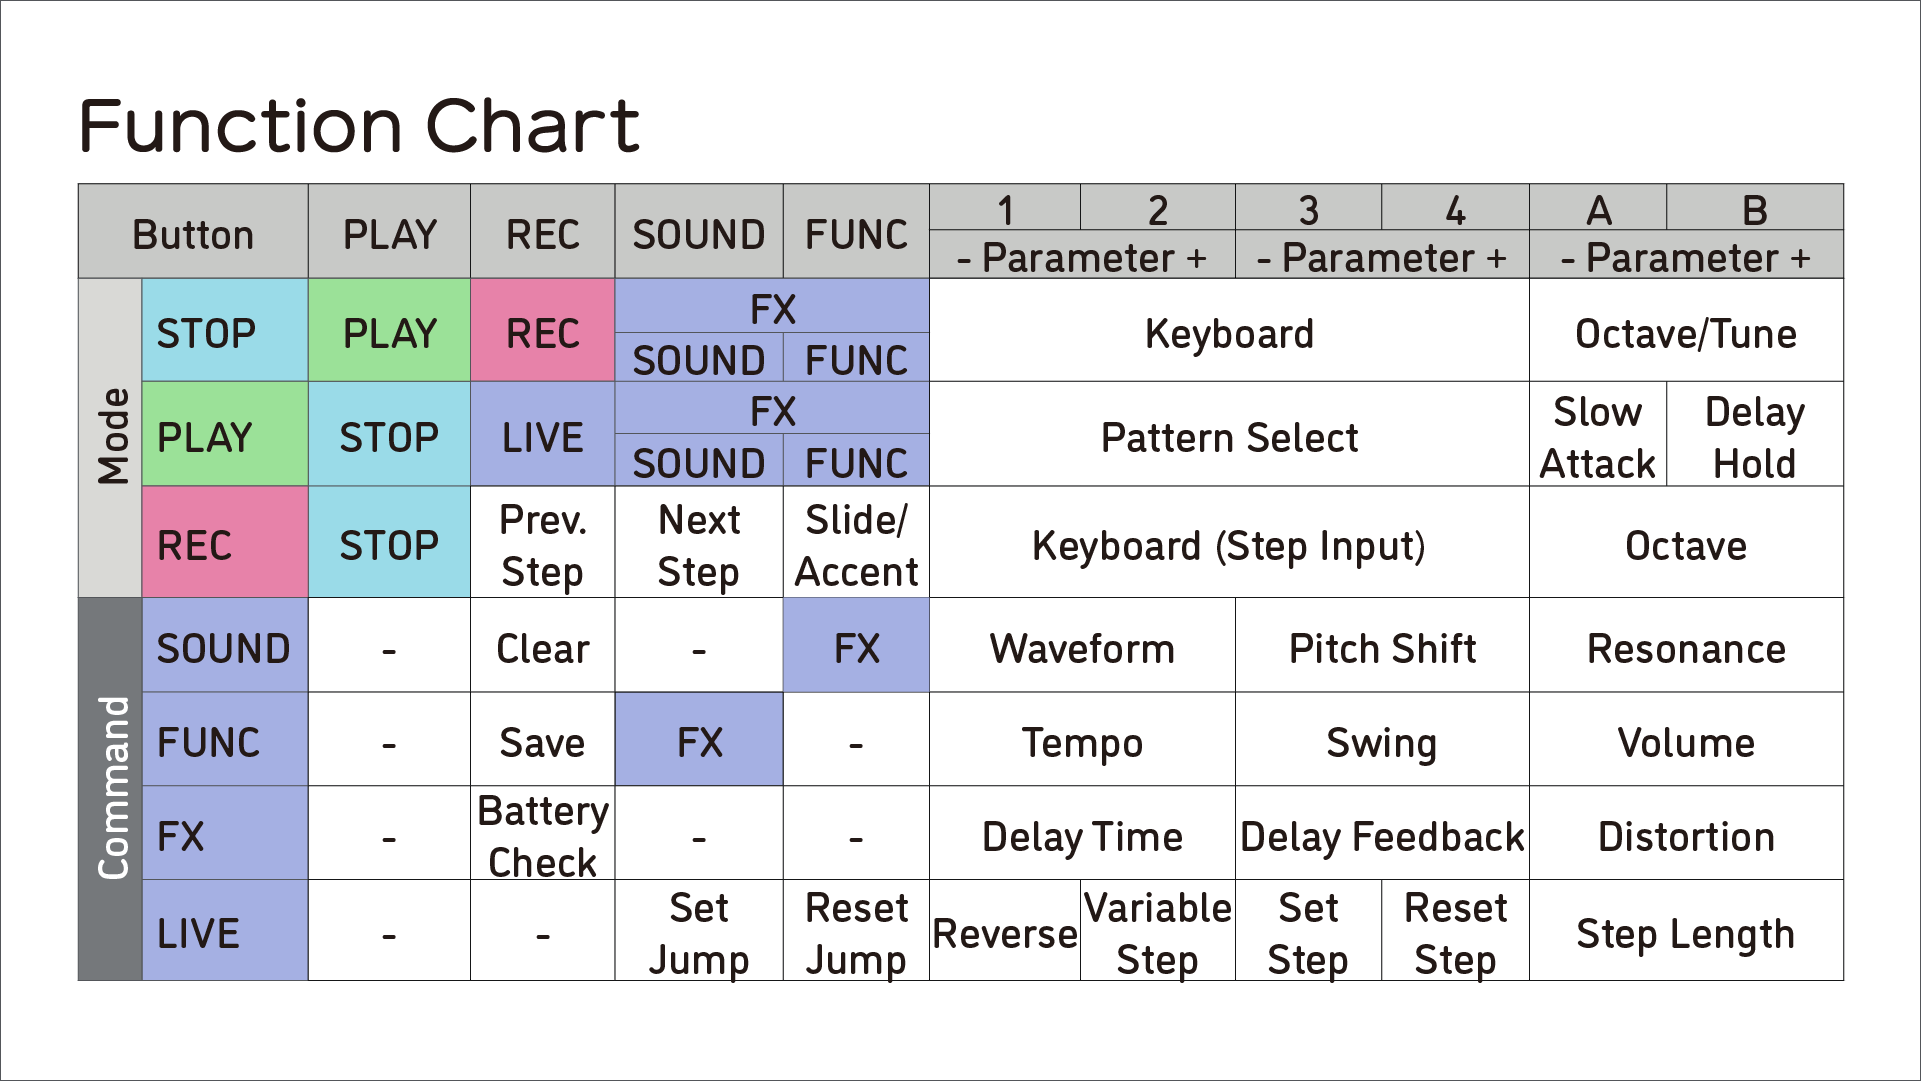
The Button row represents the target button. Since the parameters actually operated by each button are different for each mode and command, this table shows their correspondence.
Mode
The Mode line describes the operation during each mode. There are three modes, STOP / PLAY / REC, which are switched each time [PLAY] / [REC] is pressed, and are always in one of the states during operation.
Command
The Command line represents the operation while pressing each command button. If you press [SOUND] / [FUNC] while in STOP mode or PLAY mode, each command can be input while you are pressing.
Example
We will see how to operate in STOP mode.
- Press
[PLAY]to switch from STOP mode to PLAY mode. - Press
[REC]to switch from STOP mode to REC mode. - SOUND commands can be entered while pressing
[SOUND]. - You can enter FUNC commands while pressing
[FUNC]. - FX commands can be entered while pressing
[SOUND]+[FUNC]. [1] / [2] / [3] / [4]function as a keyboard.- Pressing
[A] / [B]increases / decreases the Octave / Tune parameter.
Parameter Table
| Command | Button | Functions |
|---|---|---|
| SOUND | [[SOUND]] + [1] / [2] |
Waveform |
| | SOUND | [[SOUND]] + [3] /[4] |
| SOUND | [[SOUND]] + [A] / [B] |
Resonance |
| SOUND | [[SOUND]] + [REC] (x2) |
Save / Copy |
| FUNC | [[FUNC]] + [1] / [2] |
Tempo |
| FUNC | [[FUNC]] + [3] / [4] |
Swing |
| FUNC | [[FUNC]] + [A] / [B] |
Volume |
| FUNC | [[FUNC]] + [REC] (x2) |
Clear |
| FX | [[SOUND] + [FUNC]] + [1] / [2] |
Delay Time |
| FX | [[SOUND] + [FUNC]] + [3] / [4] |
Delay Feedback |
| FX | [[SOUND] + [FUNC]] + [A] / [B] |
Distortion |
| FX | [[SOUND] + [FUNC]] + [REC] (x2) |
Battery Check |
| | ||
| |
Layout
Panel Layout
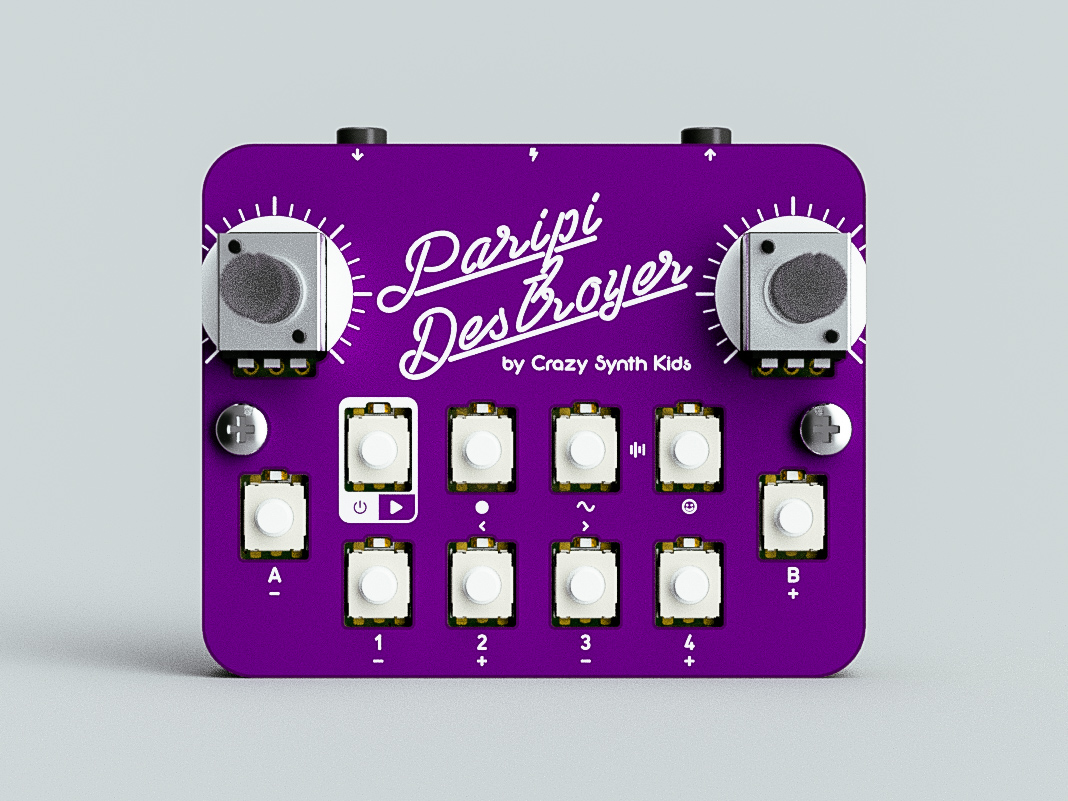
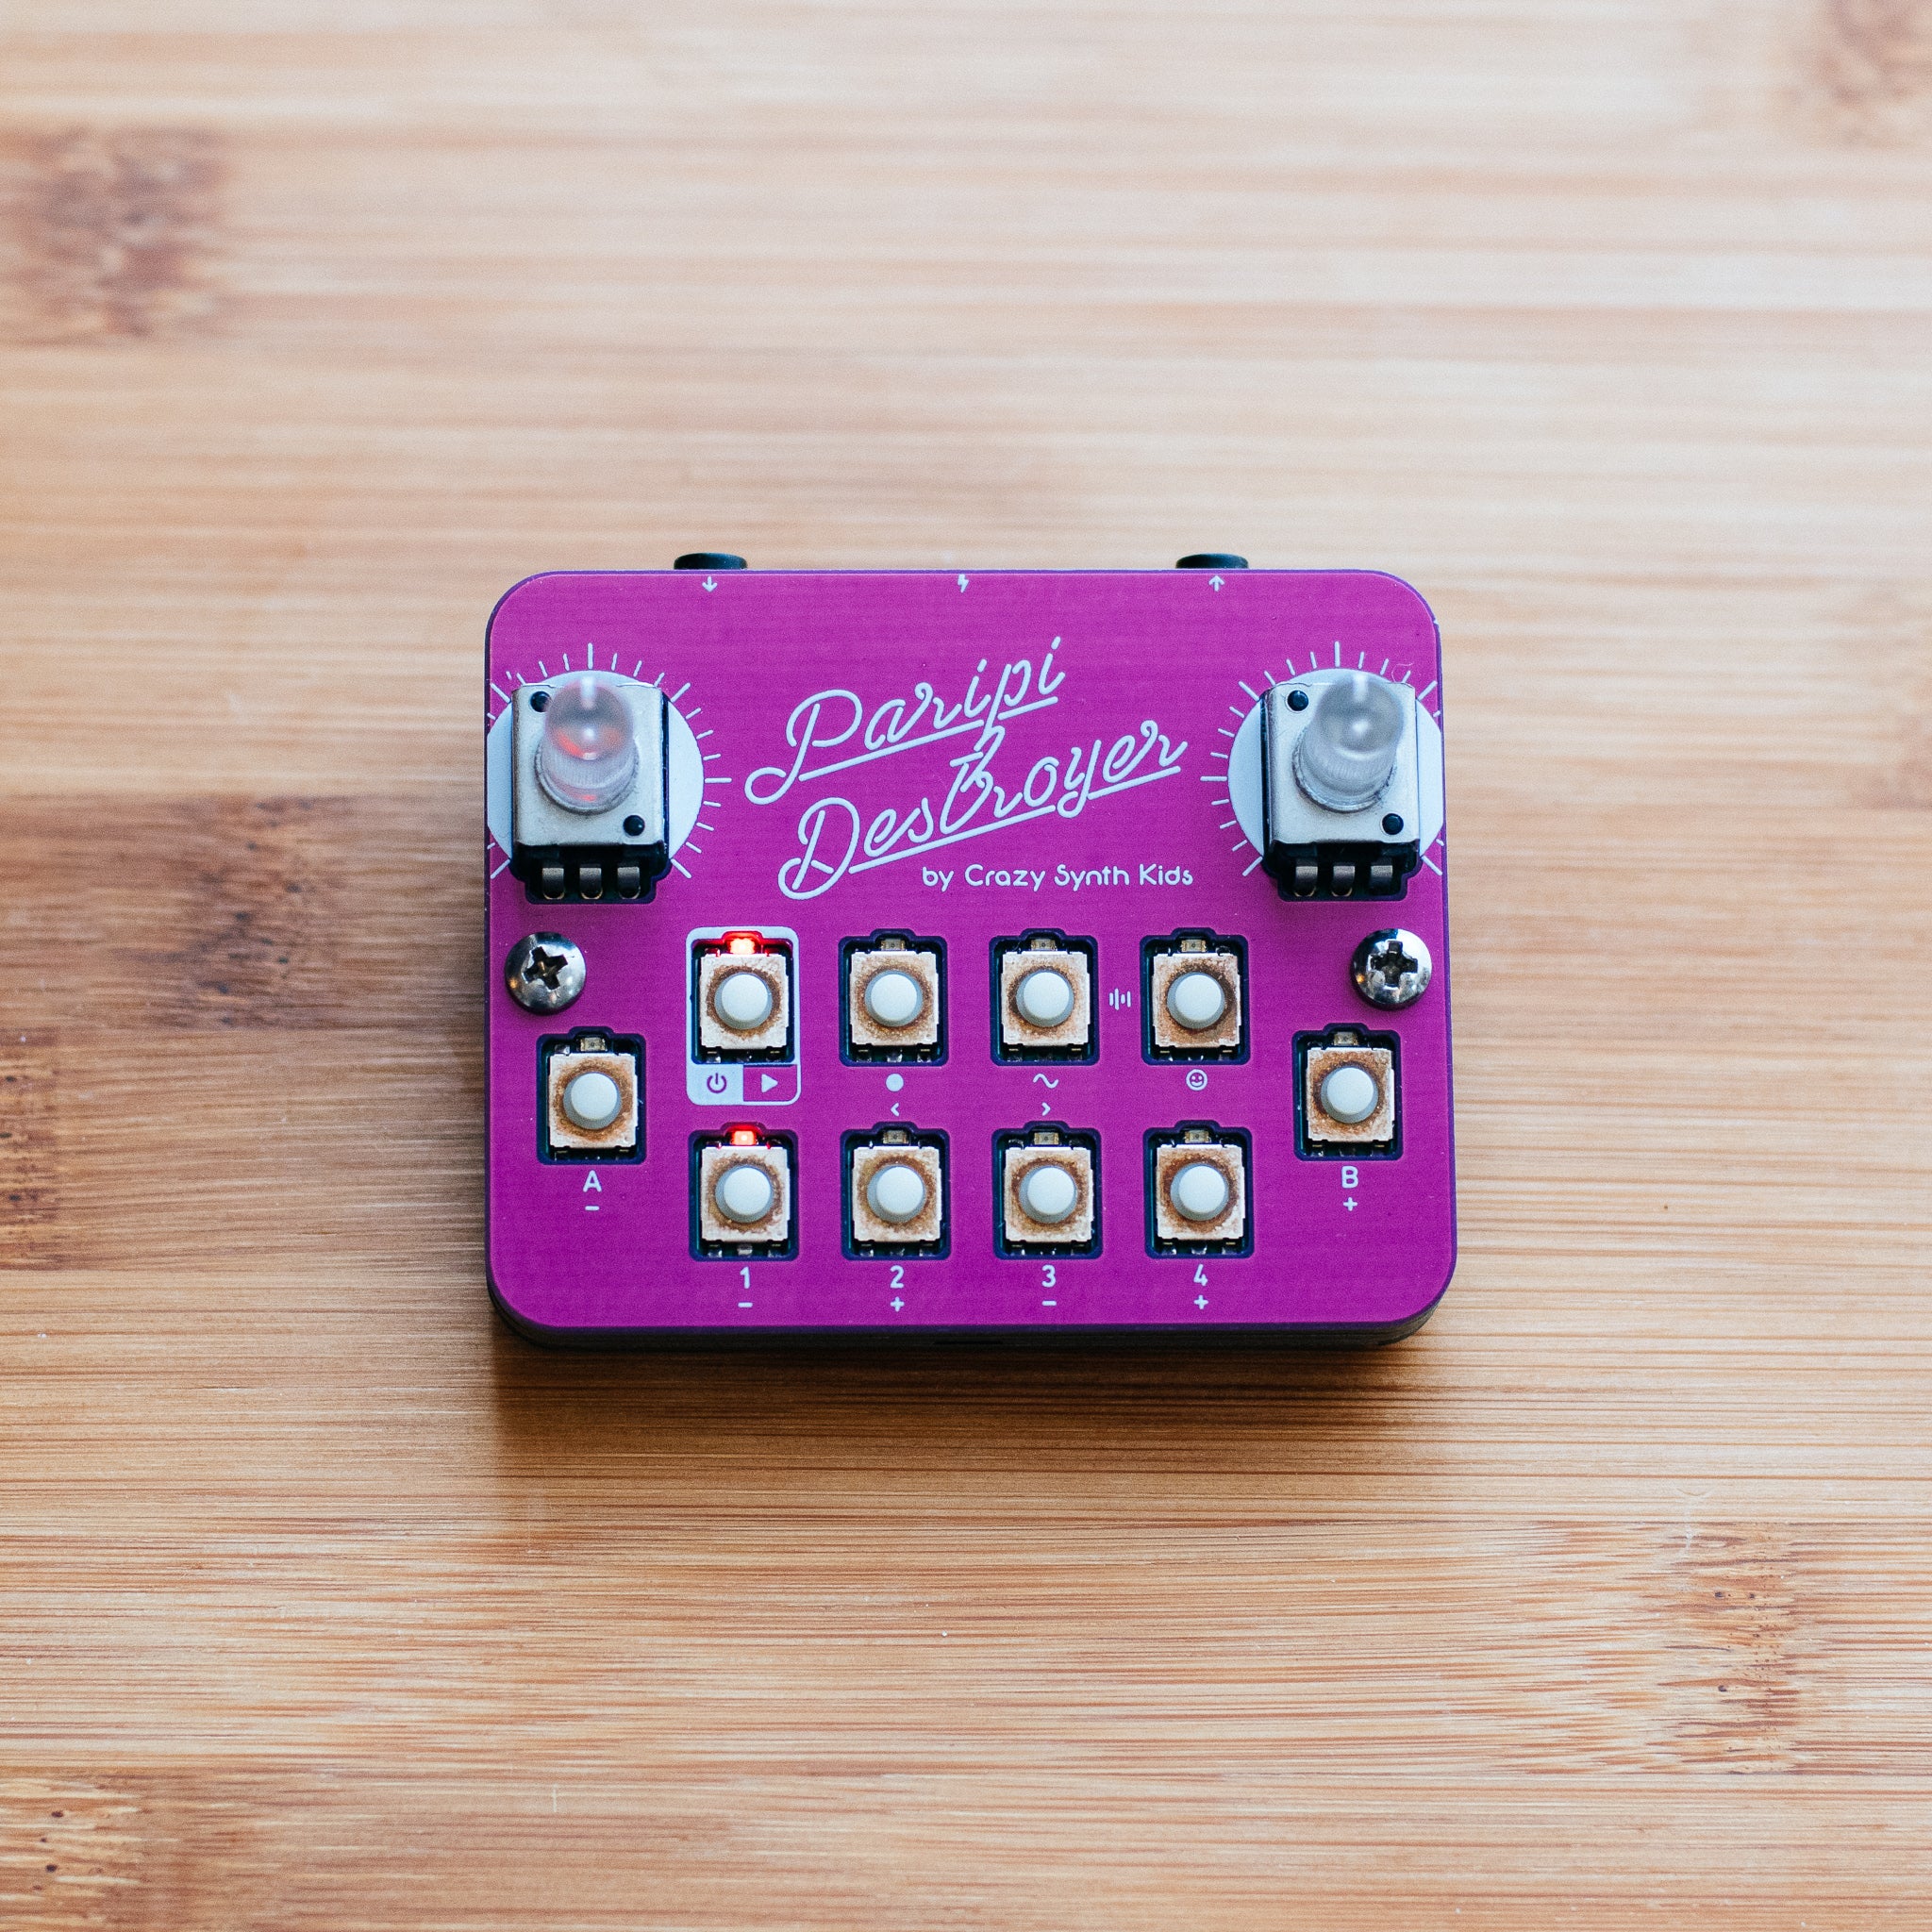
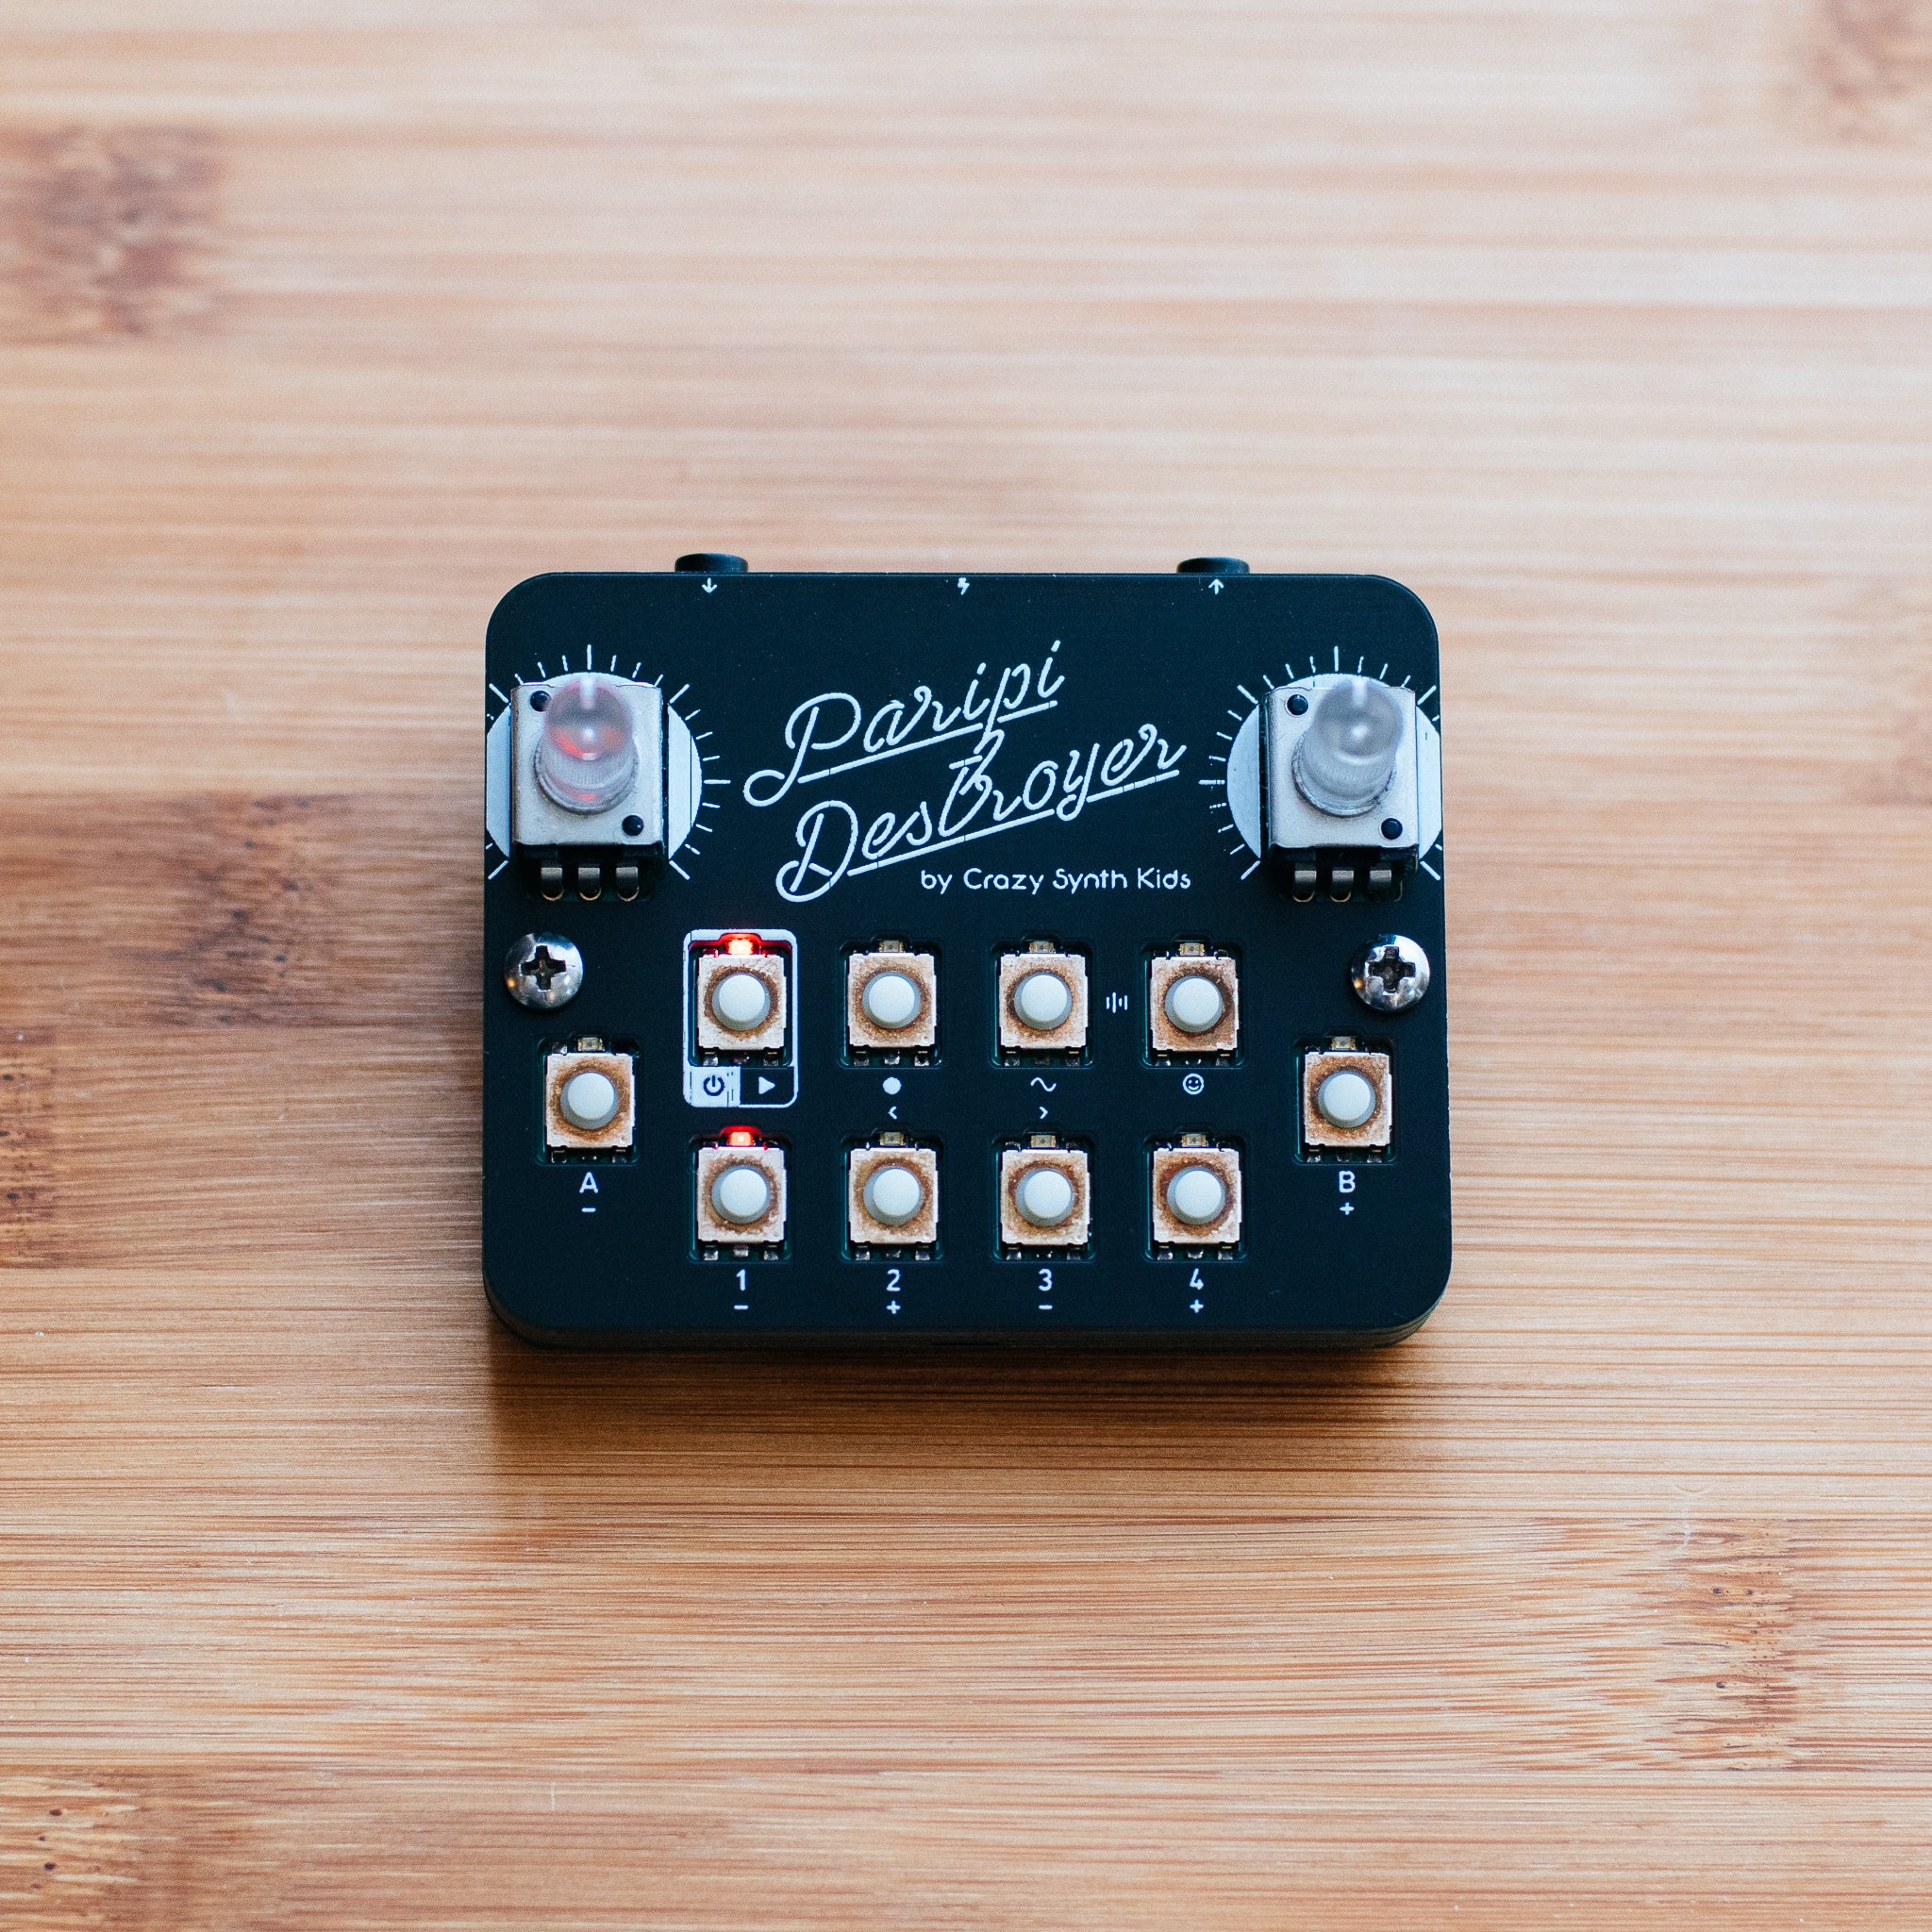
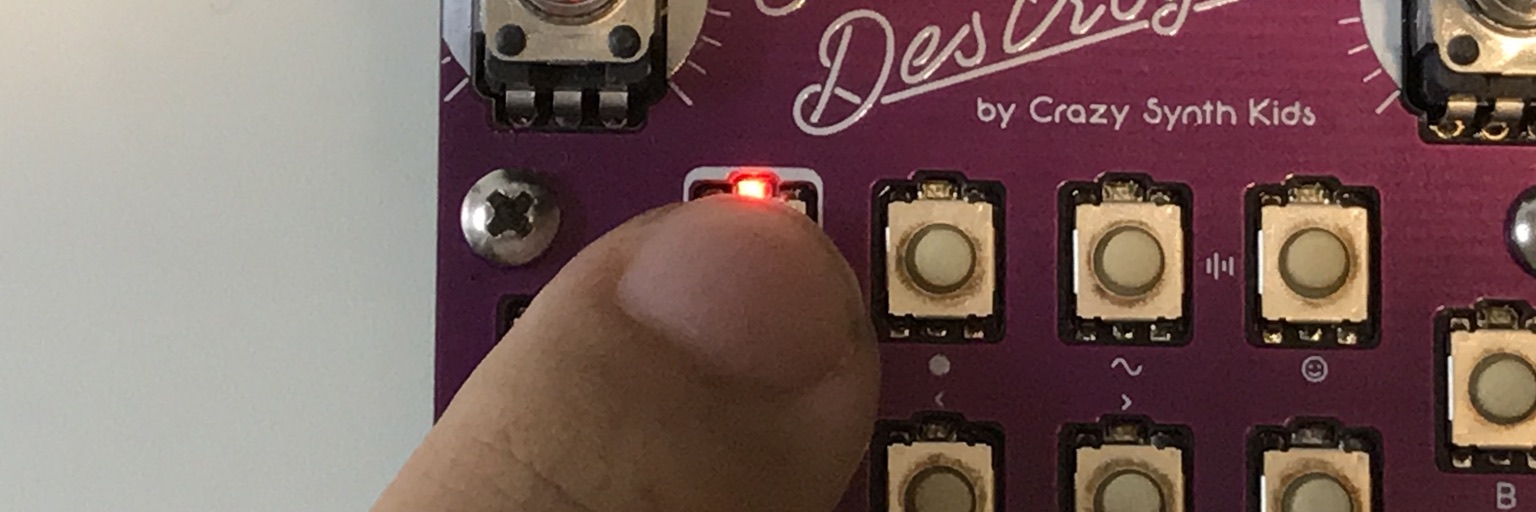
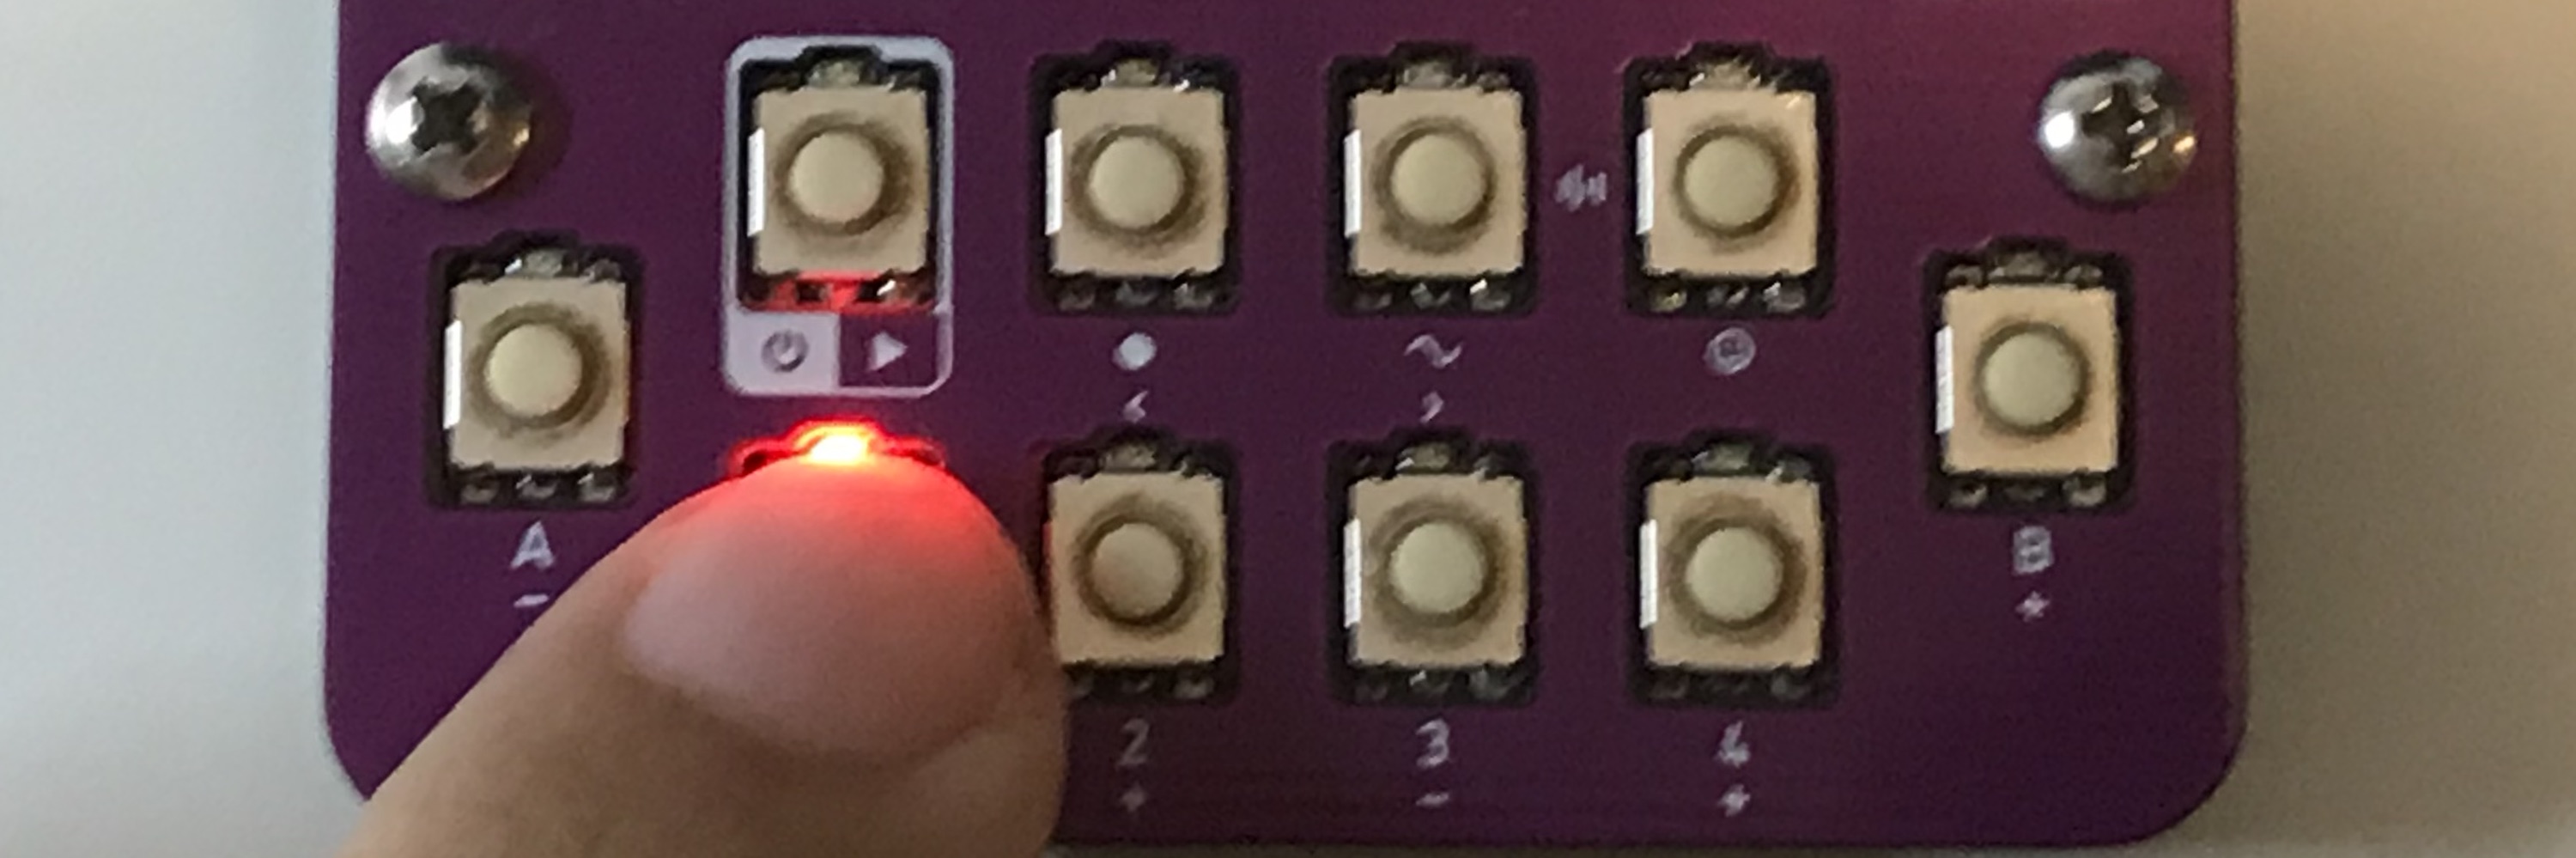
[Cutoff]- VCF / Cutoff Adjustment[Decay]- Envelope / Decay Adjustment[PLAY]- Sequence playback / stop (PLAY mode <-> STOP mode)[REC]- Sequence recording (STOP mode ➜ REC mode)[SOUND]- Press and hold to enter SOUND command (Press simultaneously with FUNC to enter FX command)[FUNC]- Enter FUNC command by pressing and holding[A] / [B]- Slow Attack / Delay Hold (PLAY mode), Octave / Tune (STOP mode / REC mode). Command input in combination with[SOUND]and[FUNC][1] / [2] / [3] / [4]- Pattern Select (PLAY mode), Keyboard (STOP mode / REC mode). Command input in combination with[SOUND]and[FUNC]
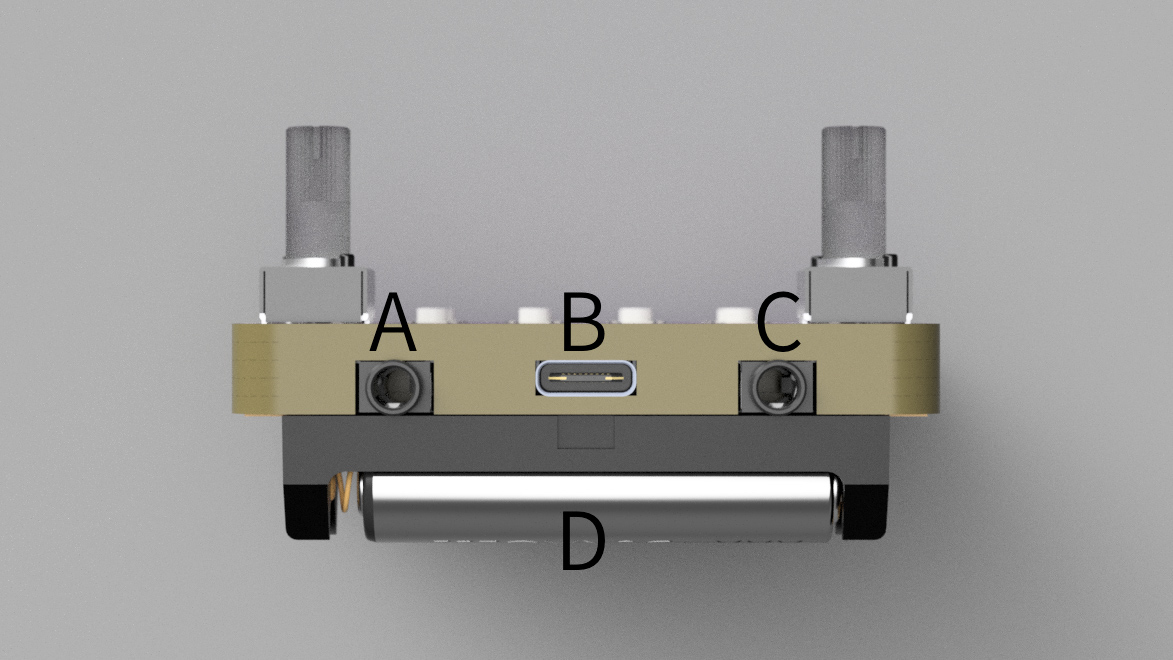
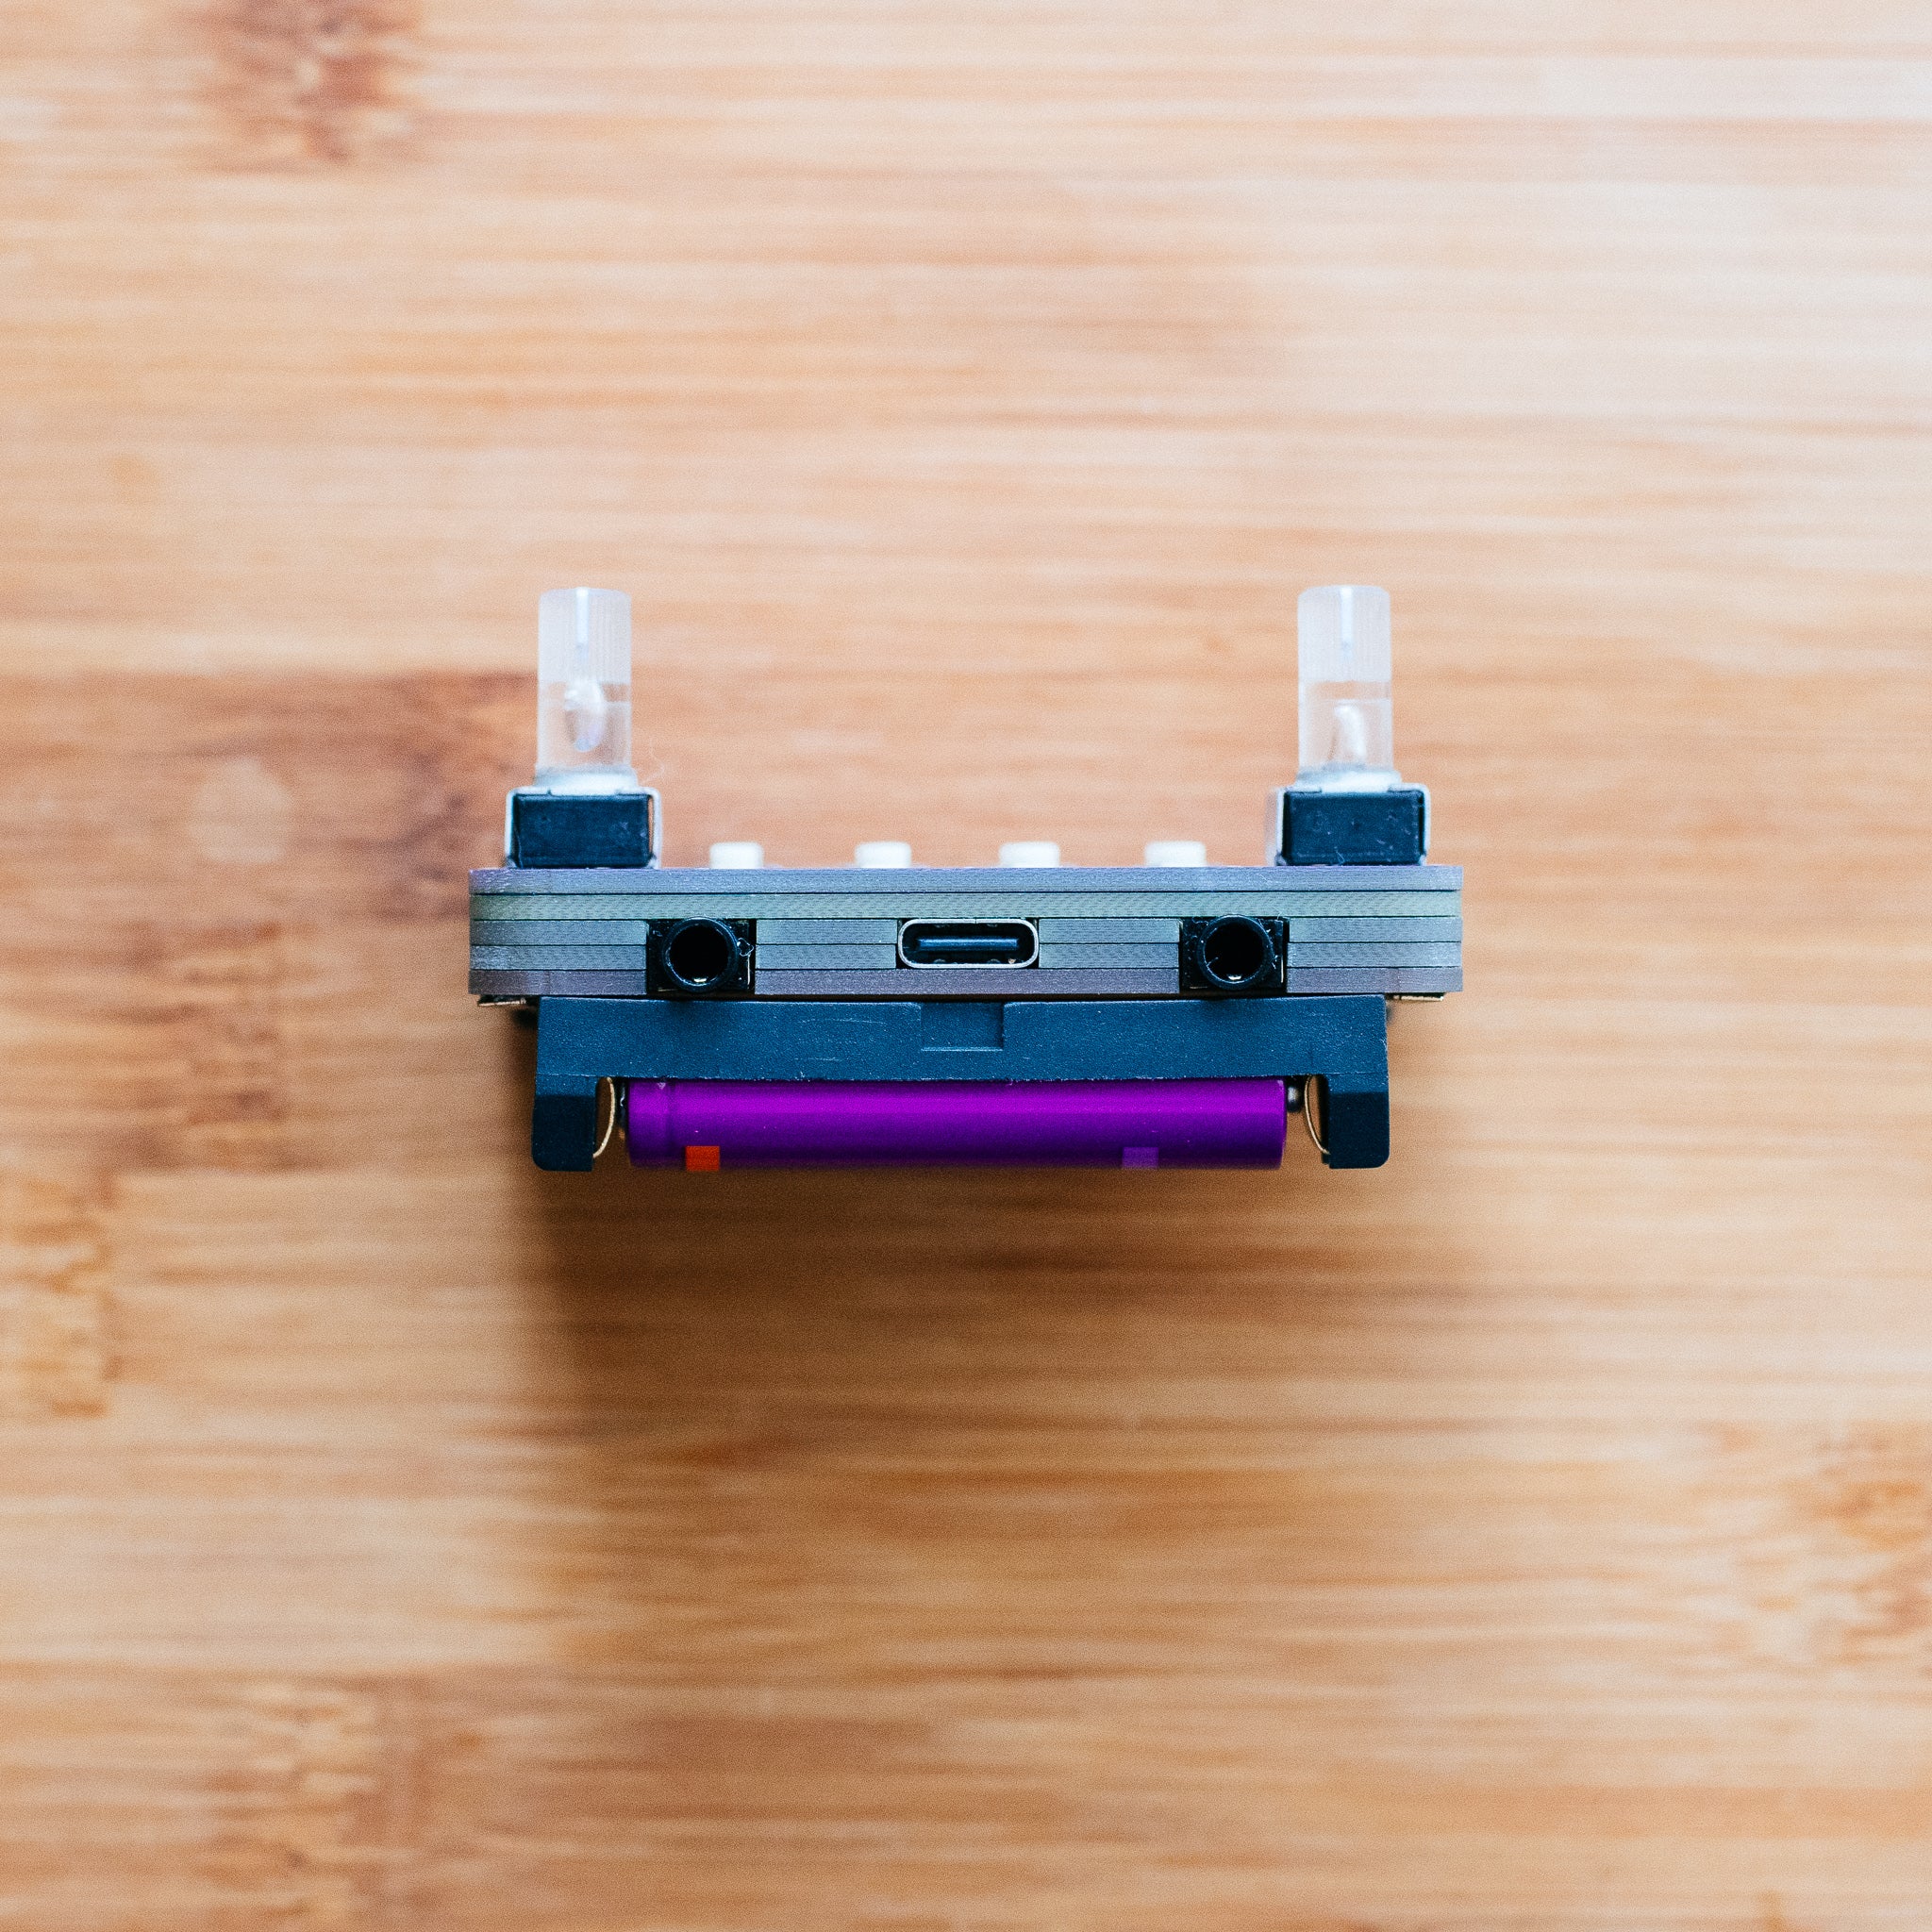
- Headphone Jack
- USB-C Port
- SYNC Terminal
- Battery
Audio Output
Built-In Speaker
The built-in speaker is active when nothing is connected to the headphone jack.
When running on batteries, the volume of the speaker is gradually limited according to the voltage of the battery. There are no restrictions when connecting to a USB power source.
Depending on the tone you play, crackling may occur. In that case, lower the volume to a level that does not distort the sound.
Headphone / Line Out
- Connector Shape: 3.5mm TRS stereo mini jack
- Uses: Connects to headphones or external devices with LINE input
- Function:
- Stereo Audio Output
- Speaker Auto Off
- Built-In Speaker OFF when stereo mini plug is inserted
- Sync Signal Output
- Sync signal from one end and monaural audio from the other using a split cable
If you connect a stereo mini plug to the headphone jack, the audio output will switch from the built-in speaker to headphone / line output. The internal speaker and headphone/line out cannot be played at the same time. Please pay attention to the volume when connecting headphones.
Volume Control
Volume is adjusted with [1]/[2] while pressing [FUNC] in STOP / PLAY mode.
- Hold down
[FUNC]and press[1]to decrease the volume by one step. - Hold down
[FUNC]and press[2]to increase the volume by one step.
Adjust the volume of the speaker when the built-in speaker is enabled, and the volume of the headphone / line output when the headphone / line output is enabled.
Speaker volume settings and headphone / line output volume settings are treated separately.
The set volume is saved by Save operation or Auto Save.
SYNC Input / Output
SYNC Input
Synchronized performance can be performed by inputting a SYNC signal from an external device to the SYNC terminal.
The corresponding SYNC standard (PPQN) is switched by FUNC tempo command during SYNC input.
Supported SYNC standards:
- 2PPQN (1 PULSE)
- KORG Volca Series, Electribe2 / Sampler2
- Teenage Engineering Pocket Operator (PO) series, etc.
- infinitedigits pikocore
- 4PPQN (1 STEP CLOCK)
- KORG monotribe, etc.
Maximum input voltage: 15V (pulsed) Plug: Stereo mini-plug or monaural mini-plug can be used.
SYNC Output
In firmware v1.0.0, Tip / Ring is reversed, and it is not possible to output as specified. This is fixed in subsequent updates.
A SYNC signal can be output from one channel (L / Tip) of the headphone jack by setting in Global Options.
A stereo split cable is required to take advantage of this feature. Recommended Product: Hosa YMM-261 Stereo Split Cable
Using a stereo split cable, the stereo mini-receptacle TIP and RING can be split into monaural mini-receptacles.
Each output is
- TIP: SYNC Signal
- RING: Audio Signal
Teenage Engineering's PO series can be used for SYNC input / audio input with a single stereo cable without a split cable.
Power Supply
Battery
- Compatible batteries:
- AAA alkaline battery (recommended)
- AAA Ni-MH rechargeable battery (AAA) x 1
- Operating time:
- Up to 10 hours with headphone output
- Up to 5 hours with speaker output
Unsaved sequences and parameters will be lost when the batteries are removed. Before turning off the power in step 1, perform the Save operation.
Restrictions on battery operation
When operating on batteries, the maximum volume of the built-in speaker is limited by the current battery voltage. If you want to use it without restrictions, please use an external power supply via USB.
Using the FX command with [[SOUND] + [FUNC]] + [REC] (x2) you can check the battery levels.
USB-C Power Supply
- Connector Shape: USB Type-C
- Uses: Power Supply / Firmware Update
- Voltage: 5V
- Maximum current consumption: 500mA
In addition to AAA batteries, it is possible to supply power using a USB cable. When USB power is supplied, even if a battery is installed, the power supply will automatically switch to USB, and USB will be given priority.
Connect the USB cable to an AC adapter, computer, portable battery, etc., and connect the other end to the USB Type-C receptacle of the device.
<Cutoff> / <Decay> flashes slowly when powered from USB, even when the power is off.
Precautions when using mobile battery
Many mobile batteries have an auto power off function that cuts off the power supply when the current consumption is low. Therefore, when using this product continuously with a mobile battery, it is necessary to drive the built-in speaker and consume as much current as possible.
If you want to use a mobile battery when connecting headphones/LINE, you can avoid auto power off by connecting another device to an empty port on the mobile battery and consuming more than a certain amount of current.
Or use a mobile battery that does not have an auto power off function.
If continuous operation is required for live performances or recordings, please use the AC adapter.
Sequencer
The sequencer function is used in PLAY mode / REC mode.
Four 16-step sequence patterns can be recorded. Patterns are switched (selected) in PLAY mode and recorded in REC mode.
Also, when switching from STOP mode to REC mode, you can press [REC] while holding down any pattern button to move to sequence editing with any pattern selected.
Memory / SRAM & Flash
Save sequence & parameters.
Memory Configuration
There are two types of internal memory: SRAM, which retains the current state, and FLASH, which retains data. Data in SRAM is lost when the power is turned off, but data saved in FLASH is retained.
The set parameters and recorded sequences are held in SRAM. If you remove both the battery and the USB cable without saving the data to FLASH, the data on the SRAM will be lost.
Save Sequence / Parameters
Save sequences/parameters in FLASH and retain the data even if the power is turned off or the battery is removed.
Manual Save
Sequences and parameters can be saved with the Save operation.
Auto Save
If Auto Save is ON in Boot Option, it will be overwritten automatically when the power is turned off.
Discard Current Data
If you turn off the power without performing the Save operation while Auto Save is OFF, the entered sequence and adjusted parameters will be lost. When the power is turned on again, the last saved sequence / parameters will be loaded.
Sequence / Parameter unload
When the power is turned off, hold down [REC] and press [PLAY] for about 1 second to turn on the power, and the saved sequence / parameters will not be loaded and the unit will start up in the factory settings.
Factory Reset
If you unload the sequence / parameter and save it without inputting the sequence / parameter, it will return to the factory settings.
Mode Switching
There are three modes, STOP / PLAY / REC, which are switched each time [PLAY] / [REC] is pressed, and are always in one of the states during operation. Also, the operation method is different for each. Please refer to each explanation for the operation method.
STOP Mode
Stop Sequence / Keyboard Input
In STOP mode, the following operations are possible while the sequence is stopped. The device boots into this mode.
- Playing on the keyboard and editing the pitch
- Each command operation (except LIVE command)
- Adjusting
[Cutoff] / [Decay]
Press [PLAY] to enter PLAY mode and start playing the sequence.
Press [REC] to enter REC mode, enabling recording and editing of the last sequence selected in PLAY mode.
Pattern 1 is selected at the first startup. If you press [REC] while pressing [1] / [2] / [3] / [4], you can select any pattern from Pattern 1 to Pattern 4 and record / edit it.
While holding down [SOUND], use [1]-[B] to enter the SOUND command.
Enter the FUNC command by pressing [1] to [B] while pressing [FUNC].
While holding down [SOUND] + [FUNC], use [1]-[B] to enter FX commands.
Keyboard
[1] / [2] / [3] / [4] function as the keyboard.
Octave
- Pressing __
[A] / [B]alone shifts the keyboard octave. - If you hold down
[A] / [B]and press[1] / [2] / [3] / [4], the sound will temporarily sound an octave higher or lower, then return to pitch.
Tune
- Pressing
[A] / [B]while pressing a key raises or lowers the pitch of the keys pressed by semitones within a range of one octave.
PLAY Mode
Play Sequence
In PLAY mode, the sequence is playing, and the following operations are possible.
- Switching playback patterns
- Input each command
- Adjusting
[Cutoff] / [Decay] - Slow Attack / Delay Hold effect
If you press [PLAY] while in PLAY mode, it will enter STOP mode and the sequence will stop.
Enter the LIVE command while holding down [REC].
You can enter SOUND commands by holding down [SOUND].
Enter the FUNC command by holding down [FUNC].
Enter FX commands by holding down [SOUND] + [FUNC].
Pattern Select
Switch the sequence pattern with [1] / [2] / [3] / [4].
[1]: Play Pattern 1[2]: Play Pattern 2[3]: Play Pattern 3[4]: Play Pattern 4
If you press the same pattern continuously, the step position will be reset and playback will start from the beginning of the sequence.
If you press another pattern, the step position will not be reset and playback will start from the next step.
Slow Attack
The attack time of the envelope is lengthened while [A] is held. Release [A] to return.
Delay Hold
Delay Feedback is maximized while [B] is held. When [B] is released, it returns to the setting value before it was pressed.
REC Mode
Recording and editing sequences. In REC mode, you can create and edit sequence patterns using step input.
If you press [PLAY] while in REC mode, REC mode will end and PLAY mode will start, and the sequence will start playing. If you press [PLAY] in the middle of a sequence the step at the time of pressing will be the number of steps that will be played.
Previous Step / Next Step (Cursor Movement)
Press [REC] to move the current step position in the decreasing direction, and press [SOUND] in the increasing direction. Also, going below 0 steps goes to 16 steps, going above 16 steps goes to 0 steps.
Slide / Accent
- Pressing
[FUNC]will light<Decay>and enable Slide for the current step. Slide smoothly connects the current step to the pitch of the next step. - Press
[FUNC]again to turn off<Decay>, turn on<Cutoff>, disable Slide and enable Accent for the current step. A step with an accent will have a slightly louder volume. - Pressing
[FUNC]a second time will turn off the<Cutoff>indicator and disable the current step Accent input.
Keyboard (Step Input)
[1] / [2] / [3] / [4] function as the keyboard. Each time you press a key, one step will be recorded. The recording will overwrite the selected sequence pattern.
Octave
Press [A] / [B] to change the pitch of the current step up or down an octave.
Step Display
- The four lamps on the top represent the current step position.
- 4 steps for 4 levels of brightness, 16 steps for 4 minutes.
Command Input
By entering commands that can be operated only while pressing [SOUND] / [FUNC] individually or simultaneously, each parameter can be adjusted and functions can be enabled / disabled. There are a total of 4 types of commands: SOUND / FUNC / FX / LIVE.
Three types of commands valid in STOP mode or PLAY mode:
- SOUND command
- FUNC command
- FX command
One type of command valid only in PLAY mode:
- LIVE command
Parameter Adjustment by Command Input
Increase / Decrease Parameters
When inputting a command, if the assigned function is parameter increase/decrease, the [1] / [2], [3] / [4], and [A] / [B] buttons are paired and pressing the [1] / [3] / [A] button decreases the parameter value, and pressing the [2] / [4] / [B] button increases the parameter value.
Parameter Display with Lamps
The lamps above each button progressively display the current parameter value.
- The
[1] / [3] / [A]lamps are brightest at the minimum value of the parameter and darkest at the maximum value. - The
[2] / [4] / [B]lamps are brightest at the maximum parameter value and darkest at the minimum value.
SOUND Command
Adjusting sound parameters. Works by holding down [SOUND] while in STOP mode or PLAY mode.
Waveform
[[SOUND]] + [1] / [2]
Select the waveform from 8 options:
- Sine
- Saw
- Super Saw
- Saw-Square1
- Saw-Square 2
- Saw-Square 3
- Square
- Square 25%
Pitch Shift
[[SOUND]] + [3] / [4]
Shifts the overall pitch up or down by semitones.
Resonance
[[SOUND]] + [A] / [B]
Adjusts Filter Resonance.
Clear Sequence
[[SOUND]] + [REC](x2)
Press and hold [SOUND] and press [REC] to wait for clear and the current pattern will flash.
While holding [SOUND], press the button of the pattern whose sequence you want to clear to select it, then press [REC] again to clear the sequence of the selected pattern.
FUNC Command
Adjust volume and tempo. Works by holding down [FUNC] while in STOP mode or PLAY mode.
Volume
[[FUNC]] + [A] / [B]
Adjust the volume.
Tempo
[[FUNC]] + [1] / [2]
Adjust the tempo. Adjusts PPQN during SYNC input.
Swing
[[FUNC]] + [3] / [4]
Adjust your swing.
Save Sequence
[[FUNC]] + [REC](x2)
Hold down [FUNC] and press [REC] to enter save standby mode and the current pattern will flash.
Press and hold [FUNC] and press [REC] again to save the current sequence and parameters to memory (FLASH).
Keep pressing [FUNC] during the save sequence. If you release it in the middle, the save standby state will be cancelled.
If the save operation is performed while the sequence is playing, the sound will be interrupted while saving is in progress.
Copy Sequence
If you press a button other than the current pattern while waiting to save, you can select the save-destination pattern.
For example, if you want to copy the Pattern 1 sequence to Pattern 2 , select Pattern 1 in PLAY mode, hold down [FUNC] and press [REC] to put it in save standby mode, press [2] to specify Pattern 2 as the save destination, and then select Pattern 2. After confirming that is flashing, press [REC] again.
Save Parameters
Parameters are saved when the sequence is saved. Since all parameters are commonly handled by the four patterns, parameters cannot be set for each pattern.
FX Command
Adjusting effect parameters. It works by holding down [SOUND] and [FUNC] at the same time in STOP mode or PLAY mode. Press and hold [SOUND] and [FUNC] simultaneously while entering FX commands.
Distortion
[[SOUND] + [FUNC]] + [A] / [B]
Adjust Distortion.
Delay Time
[[SOUND] + [FUNC]] + [1] / [2]
Adjust the Delay Time.
Delay Feedback
[[SOUND] + [FUNC]] + [3] / [4]
Adjust Delay Feedback.
Battery Check
[[SOUND] + [FUNC]] + [REC](x2)
The current battery voltage is displayed for 3 seconds. Eight stages are displayed with eight lamps of PLAY/REC/SOUND/FUNC/1/2/3/4. For example, immediately after replacing the battery, the lamps from PLAY to 3 light up and the lamp 4 blinks. As the battery voltage drops, the number of lamps that light up will decrease. Just before the battery runs out, only the PLAY lamp will flash.
Immediately after startup, when the volume is low, or when headphones are connected, the battery voltage is displayed higher. Please check after running for a while after starting.
If you press the REC button while holding down the SOUND button and FUNC button in STOP mode or PLAY mode, you can display the current battery voltage in 8 levels. Use this as a rough guideline for remaining battery power.
- 1.06V
- 1.08V
- 1.10V
- 1.14V
- 1.18V
- 1.24V
- 1.32V
- 1.48V
Since the battery voltage fluctuates when the current consumption is large, such as when using a speaker, the display of remaining power is not accurate.
LIVE Command
Adjustment of step length It works by holding down [REC] while in PLAY mode.
Reverse
[[REC]] + [1]
Reverse playback of the sequence from the point of pressing. If Reverse is enabled, <1> lights up during the LIVE command.
Variable Step
[[REC]] + [2]
Changes the current Step Length to the number set in Step Length. If Variable Step is enabled, <2> lights up during the LIVE command.
Set Step
[[REC]] + [3]
Returns to the first step with the step at the time of pressing as Step Length. If Set Step is enabled, <3> lights up during the LIVE command.
Reset Step
[[REC]] + [4]
If Set Step is enabled, disable it and return to the first step.
Step Length
[[REC]] + [A] / [B]
Adjust the Step Length .
Set Jump
[[REC]] + [SOUND]
Sets the step at the time of pressing as Jump Step.
Once Jump Step is set, it will jump to the set step when pressed after that.
Reset Jump
[[REC]] + [FUNC]
Disables the Jump Step that has been set.
Global Options
Press [FUNC] while booting to enter Global Options, where you can make various settings.
Save & Quit
[PLAY]
Press [PLAY] to save the settings in Global Options, exit, and boot normally.
Auto Save Option
[REC]
Feature Description: Automatically save the sequence and various parameters.
Method of Operation: Each time [REC] is pressed, ON/OFF is switched. It is ON when <REC> is lit, and OFF when it is not lit. The factory setting is ON.
Auto Play Option
[SOUND]
Feature Description: When you enter up to 16 steps in REC mode, it automatically switches to PLAY mode and starts playing the sequence. If you operate the cursor while inputting a sequence, Auto Play will be canceled temporarily.
Method of Operation: Each time [SOUND] is pressed, ON/OFF is switched. It is ON when <SOUND> is lit, and OFF when it is not lit. The factory setting is ON.
Auto Power Off Option
[FUNC]
Feature Description: In this mode, the power is automatically turned off if no buttons are pressed for a certain period of time when battery-powered and in STOP mode.
Method of Operation: Each time [FUNC] is pressed, ON/OFF is switched. <FUNC> is ON when fully lit (30min.), ON when half lit (5min.), and OFF when unlit. The factory setting is ON (30min.). Auto Power Off Option is disabled when USB power is supplied.
SYNC Option
[A]
Feature Description:
Bypass: Bypasses the signal from the SYNC input to the SYNC output .
Endless: It internally converts the signal from the SYNC input and outputs it to the SYNC output .
Start/Stop The signal from the SYNC input is internally converted and output to the SYNC output only in PLAY mode .
Method of Operation: The function switches each time [A] is pressed. Start/Stop when <A> is fully lit, Endless when it is half lit, and Bypass when it is off. The factory setting is Endless.
SYNC Out Option
[2]
In firmware v1.0.0, Tip/Ring is reversed, and it is not possible to output as specified. Works with v1.0.1 Beta or later.
Feature Description: When the SYNC Out Option is set to ON, one channel of the headphone jack (TRS jack Tip) will be used as the SYNC output and the SYNC signal will be output. Audio is output from the other side (Ring of the TRS jack).
Method of Operation: The function switches each time [2] is pressed. It is ON when <2> is fully lit (4PPQN), ON when it is half lit (2PPQN), and OFF when it is not lit. The factory setting is OFF. When the SYNC input is set to ON, the output conforms to the SYNC Option setting regardless of whether it is 4PPQN or 2PPQN .
Cover Replacement
The top panel of the Palipide Destroyer can be removed by removing two screws. The panel that is installed as standard is reversible, so you can choose your favorite design.
Things necessary:
- Phillips screwdriver (PH1/NO.1)
You can use a regular Phillips screwdriver, but using a poor quality or nonstandard one may damage the screw holes.
If you close it more tightly than necessary, the board may be distorted or cracked. Also, if it is too loose, it may disassemble during use.
Replacement Procedure
- While holding the main body, loosen the screw and remove it.
- Grab the side of the main unit and press the knob downward while slowly removing the top panel.
- Attach the top panel to be replaced/turned over and tighten the two screws.
Firmware Update
Currently available as a beta version.
Download Backup Firmware Updater Website
A firmware updater that runs on Google Chrome on Windows/macOS. Please follow the instructions on the link.
Operating Environment
- USB Cable: USB Type-C cable compatible with USB 2.0 standard
- Browser: Google Chrome 61 or higher
- Confirmed OS:
- Windows 10 Home 64bit Version 1903 OS Build 18362.959
- macOS Catalina Version 10.15.6
Firmware Version History
- Version 1.0.0:
- This is the version installed on the first 20 units.
- Version 1.0.1:
- Fixed the problem that the left and right of the audio output is reversed and the SYNC output cannot be synchronized with the PO series etc.
- Version 1.0.2 (Removed due to some unstable behavior):
- Add Accent Envelope
- VCF/VCA EG separation, Attack adjustment
- Cutoff/Decay knob curve correction
- Slide timing adjustment
- Increased minimum distortion
- Version 1.0.3:
- Improved the unstable behavior seen in Version 1.0.2 .
Experimental Firmware
This is the firmware that you can try the experimental implementation. Due to insufficient verification, the operation may be unstable, so please install at your own risk.
When installing parameter incompatible firmware, previously saved parameters must be discarded. If you start normally as it is, problems such as no sound will occur because the wrong parameters are loaded.
After installation, it usually restarts automatically, but if you turn off the power once and press and hold [PLAY] while holding down [REC] again, you can start up without loading the saved parameters and operate normally. can. After booting, you can overwrite the parameters with the Save command (hold down [FUNC] and press [REC] twice) (or AutoSave when the power is turned off) to load parameters that match the new firmware from the next time.
- Changes in REC mode
- Input REST in [SOUND]
- Move cursor with [REC]+[A]/[B]
- Randomize pattern with [REC]+[SOUND]
- Keyboard changes
- Key tuning is possible for each pattern
FAQ
Q1. There is no sound. What should I do?
A1-1. Is the Cutoff knob set to 0? Twist [Cutoff] clockwise until you hear a sound.
A1-2. Is it in STOP mode? Press the [PLAY] button to play the sequence, or press the [1]-[4] buttons (Keyboard) to play the sound.
A1-3. Is the volume set to minimum? Twist [Cutoff] clockwise until you hear a sound.
Q2. The power does not turn on. What should I do?
A2-1. Are the batteries installed? Install one alkaline AAA battery (AAA).
A2-2. Is there a remaining battery charge? Please check with FX command Battery Check.
A2-3. Is the USB power supply connected? In addition to batteries, it is also possible to operate by connecting a USB power supply.
Q3. Sequences and tone parameters are not saved. Why?
Saving parameters is done during the Save operation. If the power is cut off before these are done, the parameters cannot be saved and the data will be lost. If you want to always save parameters when the power is turned off, turn on Auto Save in Global Options. The power is cut off when:
- When both the USB power supply and dry batteries are disconnected
Q4. Even though the USB cable is connected, power is not supplied and the power turns off. Why?
This product consumes a minimum of 20mA and a maximum of 500mA. Some products such as mobile batteries have a function (auto power off) that cuts off the power supply when the current is below a certain level. These are designed for charging smartphones and other devices, and are intended to prevent unnecessary power consumption after charging is complete. The current consumption of this product is usually below the threshold of this function, so the supply will be interrupted.
Solution: If your mobile battery has multiple USB ports, you can avoid auto power off by connecting another product that consumes a large amount of current. In addition, by producing a certain amount of volume with the built-in speaker of this product, the current consumption will increase, and auto power off can be avoided.
Q5. I connected to another product with SYNC input/output, but the tempo is half or several times
A5. Please change PPQN by Tempo operation.
Q6. It doesn't work
A6. Please perform the parameter reset operation.
Remove the USB cable and batteries. Reconnect the USB cable or dry batteries (use new batteries or use a battery checker, etc. to check that there is remaining battery power). Hold [REC], press [PLAY] and wait 3 seconds to reset all parameters and boot.
Q7. I want to turn off the power, but there is sound
A7. The specifications are designed to produce sound.
Due to the structure of this product, [PLAY] also serves as the power button, so if you try to turn off the power from the sequence stop state, the sequence will be played once. When turning off the power, you can turn off the power without making a sound by turning the [Cutoff] all the way down.
General Info
Original documentation in Japanese from ParipiDestroyer Manual
Offical Name: ParipiDestroyer パリピデストロイヤー
Original Price: ¥20,000
Original Product Page Copy:
From the Internet Archive Wayback Machine
Description
※現在部品供給不足により生産・販売を休止しています。

パリピデストロイヤーはDigiLogTokyoのサブブランド”Crazy Synth Kids”のとても小さくてお茶目なシンセサイザー。
キュートなルックスとは裏腹に極悪ベースサウンドが飛び出します。
いつでもどこにでも持ち運べるサイズです。


ストーリー
2017年にちょっとした遊びでプロトタイプを作りました。様々な制約をかけて楽器を構想しているうちに、4つだけ音があれば十分にベースマシンが作れるのではないか、手は二つなのでつまみも二つあれば良いのではないかという発想で、極限までボタンとつまみを減らしてできたのが、この"パリピデストロイヤー"です。2019年2月にクラウドファンディングを行い、321台分の資金を集め製品化に至りました。
ParipiDestroyer - Curated tweets by 5icksteen


シーケンサー
16ステップ x 4パターンのシーケンサー内蔵。音程を自由にエディットできる4つのスケールキーボード。
シーケンサーでオクターブ上下やスライドを入力できるので、幅広いシーケンスを作ることができます。


音源
1VCO/1VCA/1VCFのモノフォニックバーチャルアナログ音源。
ディレイやディストーションエフェクトを内蔵。


同期


3.5mm TSまたはTRS SYNC入力。
一般的なSYNC出力とのテンポ同期が可能。
2PPQN (Volca, PO) もしくは4PPQNの切り替えが可能。


電源
USB-Cコネクタを搭載、USB電源からの5V供給もしくは乾電池で動作。
単4アルカリ乾電池 (AAA) 1本使用。
最大消費電流 500mA。
※USBケーブル、乾電池は付属しません。


>>ユーザーマニュアル <<


注意事項
本製品は製造工程上、
パネル印刷のかすれ、ムラ
パネル縁のバリ処理跡
金属部品表面の熱、酸化による変色
はんだ付け時のフラックスの付着
がごさいます。
程度の悪いものにつきましては検品で除いておりますが、ある程度については製品仕様として含まれます。